My lovely blogland friends

Showing posts with label twinkling h2o's. Show all posts

Monday, 24 July 2017

Winter Solstice from Chocolate Baroque

Good morning folks, a quick post before I dash off to work as I wanted to share this project made using stamps and stencils from Chocolate Baroque.


 I began by stamping 
Winter Dawn onto white car and coloured her with Graph'It Markers. I outlined the image with a black marker annd then applied black gesso all round and then added some colour using Twinkling H2O paint in blued and purples. I stamped the image again on acetate using versmark in and embossed with a sparkly white powder. I cut the snowflakes out and layered them up over the image. I added a little glue and glitter too give some more dimension.


 I added some stencilling around the image using the Seasonal Elements stencil and glassy gel medium, sprinkling with more glitter while the medium was still wet. The colours of the paint have bled through this while it was drying, a happy accident as I love the effect!  I applied clear versamark ink through the stencil to create the wording and embossed with Icicle WOW EP. I layered the focal image up one some corrugated card that I'd painted with black gesso and highlighted with a little silver gilding wax. I added a little scrap of ribbon and a snowflake embellishment to finish off.

I'm entering this project in the following challenges:

4 Crafty Chicks: Blue Christmas
Christmas at Sweet Stampin: Anything goes for Christmas
Frilly and Funkie: Christmas
WOW embossing powder: Anything goes with EP

Thanks so much for popping by, hope to see you again soon
Claire xx

Saturday, 29 April 2017

Stampbord domino book

Good morning crafty friends. It's my turn to share a project over on the Chocolate Baroque DT blog and today I'm sharing a little book made for the launch of the Russian collection stamps and stencils. You can find them all here


I made the covers from Stampbord dominos, I love stampbord as it takes ink beautifully. I stamped the little skyline from Babushka and added colour with Sakura Stardust pens and a water brush. Once that was dry I added some gold embossing and some glossy accents. I also embossed around the edges with WOW Gold EP


To make the concertina pages I cut a strip of card to size and folded it to fit the stampbord covers.  I stamped  the Silhouette Palaces with versamark and embossed with black EP. I then used Twinkling H2Os to paint in the sky before adding a few stars, white highlights to the towers and a little moon with silver paint.


I'm entering this project in the following challenges:

Addicted to Stamps: not a square card
An Inky Mess: Mixed Media
Lemon Shortbread: Anything goes
Simon Says Stamp: Anything goes

Thanks so much for visiting today, hope to see you again soon
Claire xx

Thursday, 1 September 2016

Texture at Chocolate Baroque

Good morning my lovelies, September already! Where is time going? Over at Chocolate Baroque, the DT are creating projects with a focus on texture so my teamies will have lots of idea for you over the next few weeks. I've used glitter to add texture to my project.


The focal image is from 'Essence of Nature' which I stamped with versamark onto a background I'd created with shades of pink twinkling H2Os. I embossed with black embossing powder and trimmed the image down before matting on black card. I created a band of by applying a strip of red line tape, removing the backing and sprinkling on lots of pink glitter. I created some more glittery texture by stamping the sentiment (from Birthday Words) with some adhesive embossing powder, heating and then applying the glitter.
I'll be finding pink glitter everywhere for weeks now lol.

I'm entering this project in the following challenges:

Crafting by Designs: Anything goes
Crafty Friends: Lots of glitter
Fab'n'Funky: Anything goes
Sparkle'n'Sprinkle: Anything goes with glitter/flock/EP
Wonderful Wednesdays: Anything goes

Thanks for visiting today,
Claire xx

Friday, 1 April 2016

Spring Flowers at Eclectic Ellapu

Good morning folks, I've chosen the Pink Team's theme for our new challenge over at Eclectic Ellapu this month and I've picked the theme of Spring Flowers. We haven't had a cold winter here in the UK but it's been very grey so it's lovely to see a little sunshine and the flowers starting to peek through. Our lovely DT have lots of inspiration for you and the Purple Team have a fab challenge theme too so if you have a minute pop over to the challenge blog and have a look around.


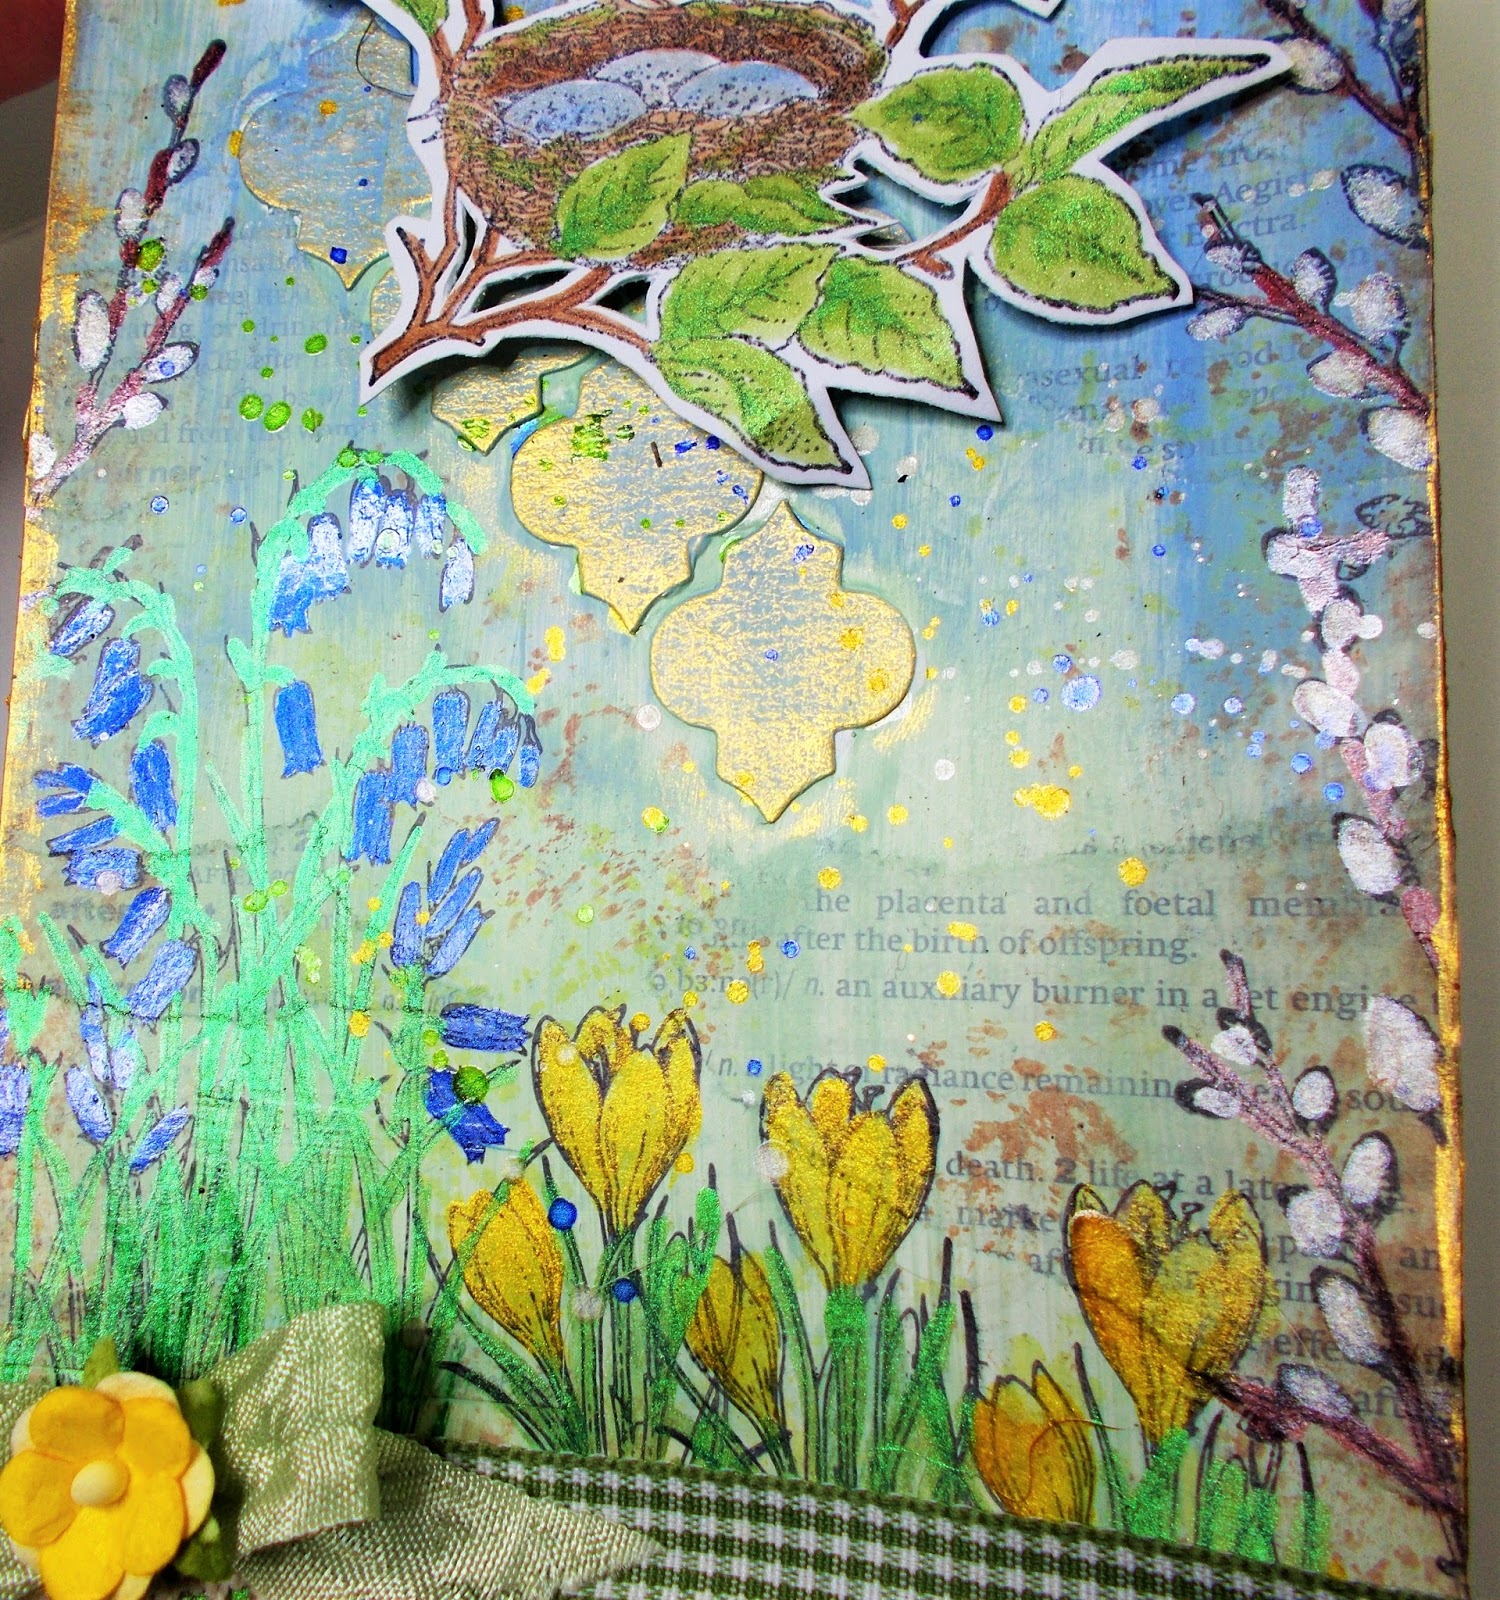
For my DT project I've made a large tag using lots of my favourite stamps from Chocolate Baroque.
To create the background I used matte medium to adhere some scraps of dictionary paper and some die cut shapes to my base tag, next a coat of watered down gesso and once that was dry came acrylic paints in yellow, green and pale blue


I splashed on some Twinkling H2o paints here and there and highlighted areas with gilding wax


I stamped the bluebells, crocuses, pussy willow and catkins (all from Chocolate Baroque's Spring Foliage set) and painted them with my Twinkling H20s, I used a white Graph'It Shake pen for the pussy willows. I also stamped the little birdie image from Chocolate Baroque's Spring Bird Crocus stamp set onto scrap card and again painted with H2os before cutting out and popping onto my tag with 3d foam pads.


To finish off I've added lace, ribbon, a little brass butterfly charm and a paper flower. 

I'm entering this tag in the following challenges:

Crafting for all Seasons: die cuts or punches
Fantasy Stampers: in the Springtime
Ooh La La: Feathered Friends
The Crafty Addicts: Anything goes/Spring

Thanks so much for visiting, hope to see you again soon
Claire xx

Sunday, 13 March 2016

Butterflies at Fashionable Stamping Challenges

Hello there folks, its challenge time over at Fashionable Stamping Challenges and this month our theme is 'Butterflies' so it's a nice easy one for you, we all love butterflies. Our lucky winner will receive a fab prize from our sponsor Flonzcraft and the DT will be choosing their Top 3 favourites too. Remember we are a stamping challenge though so no digi stamps are allowed.


I've made a tag for my DT project, I have to confess it started as a larger project but went horribly wrong lol. I managed to salvage it and rather than throw it away decided to make a tag. The background was made by glueing scraps from a dictionary page to my cardstock and stamping the focal image using 'Floral Girl' from Flonzcraft  (l just love love love this stamp, she's so cute and quirky, you can find her here)  with versmark and embossing with WOW Black EP. I  masked her with Pebeo masking fluid. If you've never tried Pebeo masking fluid you really need it, its by far the best I've never used as it dried quickly, rubs off cleanly and best of all it doesn't ruin your brush.

Next came some Twinkly h2o paints in shades of blue, green and turquoise. I used them very diluted and just let them merge on the background, adding some splashes and splatters of paint here and there. While that was drying I made the butterflies, using freebie Sheena Douglass stamps. I stamped them on dictionary pages with versamark, embossed with WOW black EP and added some colour with Twinkling h2os in shades of pink and purple. Once the paint was dry I layered up 6/7 layers of dictionary pages and cut them out for a lovely dimensional effect.


I added some texture to the background with some texture paste applied trough punchinella and an Indigo Blu stencil. 

Once everything was dry I removed the masking fluid and painted the focal image with distressinks.

To finish off I've added some tiny sparkly gems, some ribbon and a sentiment from Chocolate Baroque.

I'm entering this project in the following challenges:
Rhedd's Creative Spirit: Anything mixed media
STAMPlorations: Stamps and texture
That's Crafty : Stencils and masks
WOW Embossing Powder: Anything goes

Thanks so much for visiting today, hope to see you again soon
Claire xx

Sunday, 10 January 2016

Anything Creative/Mixed Media Goes at We Love 2 Create

Good morning folks, its inspiration time over at We Love 2 Create  so you've got another week to enter our challenge and be in with a chance to win some crafty goodies from those lovely people at Premium Craft brands! I've been playing with my PanPastels and Twinkling H2os to create this project. I love the contrast between the sparkle of the paint with the velvety matte finish of the PanPastels although it doesn't show up too well in the pic.


To make this I took a canvas board and applied shades of Turquoise and Bright Yellow Green PanPastels. Next I made a kind of mosaic using stampbord tiles to fit my stamp (Antique Songbird from Indigo Blu). I find it easiest to assemble my stampbord onto strips of double sided tape which holds it together to decorate the piece. I stamped the image with black Archival Ink and then painted with my H2os. I used the same colours to splatter the canvas board and coordinate with the stampbord. To finish off I've added a seam binding bow.

I'm entering this project in the following challenges:
Artistic Stamper: anything goes
As you like it: anything goes
Brown Sugar: anything goes
Crafty Ribbons: anything goes
Indigo Blu Challenge: all that sparkle

Thanks so much for visiting today, hope to see you again soon
Claire xx

Thanks at Fashionable Stamping Challenges

Hello there my lovelies, we've got our new challenge starting over at Fashionable Stamping Challenges and this month Esther has chosen the theme of 'Thanks/Gratitude' for us. As always our lucky winner will receive a $20 voucher from Flonzcraft ! Don't forget that you do need to ink up those stamps to play along, no digis allowed!

I've used some old paper scraps from a 12x12 kit that I thought would be perfect with this lovely Snowdrop image (from Imagination Crafts). This is the first time this stamp has been inked up although I've had it for a while. I've used kraft card for matting and layering and lots of distressing with a craft knife and also Gathered Twigs distress ink. The image was stamped with versamark and embossed with Mercury Grey WOW EP, as was the sentiment and I've added some colour with Twinkling H2os. You can see the sparkle of the EP a bit better in this pic.


I've also used ribbon, lace and pearls from my stash.

I'm entering this card in the following challenges:

Allsorts: ribbon and lace
Crafting by Designs: Anything goes
Crafts Galore Encore: Anything goes
Crafty Catz: Flowers
Creative Fingers: Anything goes
We Love Vintage: Anything vintage

Thanks so much for visiting today
Claire xx

Saturday, 27 September 2014

Stained Glass Angel from Chocolate Baroque

Good morning my lovelies, the weekend is here at last so hopefully that means lots of playtime! Today's card is one of my samples with the gorgeous new Christmas stamps from Chocolate Baroque, you can find them all here. The angel is a real beauty, she's from 'A Child is Born'


I wanted to give the impression of the angel coming to life and flying out of the stained glass windows so I began by stamping the window fragments and embossing with Gold embossing powder. I used distress inks around the edges, starting with Faded Jeans and then adding Stormy sky and then Chipped Sapphire. I painted the glass in the windows with twinkling H20 paints and then stamped the snowflakes in the corners and the sentiment (from Christmas Magic)  and embossed with gold.


I stamped the angel with Memento Tuxedo Black ink and coloured her with Graph'It markers before cutting her out and layering her over the background with 3d foam pads.

I'm entering this card in the following challenges
Hobbybook: embossing
Inky Chicks: anything goes
Inky Impressions: anything goes
Winter Wonderland: layer it up
Thanks so much for visiting today
Claire xx

Tuesday, 24 June 2014

Sparkly poppies

Good morning, isn't it lovely to have such gorgeous sunny weather? The only downside is that our office is like the fires of hell with the sun streaming in the windows but I'd be complaining even more if it was raining so I'll stop moaning lol. Today's project is a tag made using a technique I fell in love with in Craft Stamper, you know those ideas that you see and think 'Wow I wish I'd thought of that' lol.


I've used a background made with Twinkling H2os and began by stamping some Lavinia stamps using Memento inks (Bamboo Leaves, Rhubard Stalk, Lady Bug and Tuxedo Black.

Next I used a Sweet Poppy stencil to create the poppies using Sparkle Medium from Imagination Crafts, adding colour with my Graph'It markers. I'd never have thought of colouring Sparkle medium with my markers but it works perfectly,  its really hard to get a pic of the effect though


I've added black enamel accents to the flowers and the butterfly and then some little flowers stamped with stamps from Indigo Blu and painted with h2os, I popped them up up on 3d foam pads and layered it all up on some black card. To finish off I added some red seam binding ribbon.

I'm entering this in the following challenges:
Artistic Stamper: Colour it red
Charisma: sparkle and shine
Dragonfly Dreams: things with wings
Fussy and Fancy: things with wings
Imagination Crafts: all that glitters
Live and Love Crafts: summer garden
Scrapbooker Phd: add texture

Well I'd better scoot off and get ready for work so have a great day and thanks for popping by
Claire xx

Saturday, 7 June 2014

Have a magical day with Chocolate Baroque

Good morning my lovelies, the weekend is here at last! Todays card features  the beautiful fairy from the July Fairy set and one of the stamps from Fantasy Castles, both from Chocolate Baroque. I really enjoyed messing around with paint and ink to make this project


I began by stamping the fairy and castle with Black Archival ink on to watercolour card I masked them using masking tissue. Next I roughly 'splodged' on some white and some pearl acrylic paint to create the clouds. Once the acrylic paint was dry I started adding colour to the sky with lots of water and Twinkling H20 paints Once I removed the masks I had a bit of a panic as some of the blue had seeped under the mask but I found that using diluted bleach removed the colour but not the stamped image phew!! . The blue paint had also discoloured the clouds so I added some more paint and left it to dry. Next I painted the castle and then decoupaged the fairy (also painted with Twinkling H20s).


I added a little gem to the fairy's wand and stamped the sentiment (from Fairyland Words) and embossed with gold embossing powder. 
I added some chipped sapphire distress ink around the edges and matted the scene on white and then blue card to finish off.

I'm entering this card in the following challenges
Chocolate Coffee and Cards: embossing
Craft Room Challenge: things with wings
Fussy and Fancy:  outdoors
Handmade harbour: pretty
Papertake Weekly: anything goes
Simon Says Stamp Monday Challenge: Magic
Through the purple haze: make your own background
Tuesday Throwdown: paint or mist
Thanks for visiting today
Claire xx

Sunday, 25 May 2014

Create a Flower Garden at Craft a Scene

Good afternoon my lovelies, we're having a very lazy Sunday and hoping that tomorrow will bring some better weather as I've got loads of plants waiting to be planted out in the garden and we've had so much rain its been to wet to get out into the garden. This card is my DT project for Craft a Scene where our theme is 'Create a Flower Garden', hopefully the sun will shine for me to plant my flowers before too long lol


I've used Chocolate Baroque stamps for this card, the scene is coloured with distress inks and I've painted the bluebells with twinkling H20s to give them a bit of a shimmer. 

I'm entering this card in the following challenges:
Artistic Stampers: In the garden
Brown Sugar: anything goes
Charisma Cardz: May flowers
Crafty Little Fairies: in the garden
Sister Act: Anything goes
Thanks for popping by today, 
Claire xx

Monday, 19 May 2014

Words are all you need

Good morning my lovelies, well its been a very quiet weekend here with our poorly fur baby Benji resting his leg. He's a real Mum's boy and follows me everywhere so I couldn't go in my craft room as I didn't want him fall on the stairs. I wasn't going to give up crafting though so I just ended up bringing loads of stuff downstairs and taking over the dining room lol. I managed to get a couple of DT projects finished and decided to finish this project that I'd started making for the Indigo Blu Challenge where the theme is 'Words are all you need'


I knew I wanted to use this large sentiment, you can't see it very well as the photo is awful but it says "Courage, strength and determination that's what little girls are made of'. I'd given this old MDF shape a coat of gesso to cover the old design Next I set to and added some texture with Maimeri Light Modelling Paste  and a harlequin stenciland then set too with acrylic paints in pink and brown. I stamped the images which are also from Indigo Blu (Boadicea A5 set) onto tissue paper with black archival ink and painted them with Twinkling H2os, the sentiment was stamped with versamark and embossed with gold EP before applying them with Slap it on. To finish off I've added some Treasure Gold to highlight the texture and some flowers that I'd made using silicone moulds

I'm also entering this project in the following challenges:
Natalie and Amy's: Rubber stamping
Sunflower Fields: vintage/shabby/rustic

Monday, 27 January 2014

J52 Week 3 You always make me smile

Good morning folks, what dreadful weather we're having here? Still its warm and dry in my craft room so guess where I've spent most of the weekend lol. No chance of that today as I'm heading off to work in a minute yuk! My project today is my third page for Journal 52 where our prompt this time was 'You always make me smile'. I'm really enjoying this class and omg there is so much inspiration from Chelle and all the folks playing along.

This was a bit of an experiment as I'd seem this technique in Craft Stamper and decided to have a play. I stamped the Paper Artsy Flowers in Black Archival and painted them with masking fluid. I spritzed the paper and then splodged on loads of twinkling H2Os in shades of blue and purple with a little lime green here and there. I covered it up with cling film and let it dry for a bit then removed the cling fim and sprinkled some salt over the paints and left it to dry completely. I love using masking fluid, rubbing it away and seeing the image pop always makes me smile so it was a perfect technique for this prompt lol. 

The sentiment stamp is also from Paper Artsy, its one of my favourites and is guaranteed to raise a smile. I took a white sharpie pen and drew a squiggly line around the edge and then decided to draw in some grass. I added some journalling to the grasses and my page is finished. Now on to the next weeks prompt which is 'Building Character' eeeek sounds a bit scary but i'm sure i'll have loads of fun.

I'm entering this project in the following challenges:
One Crazy Stamper: anything goes
Paper Artsy:  Darcy Journalling Month one
 (pop over and have a look, as Darcy has used some amazing techniques on her page this month)
Pumpkin Spice: something shiny
Rogue Redhead Designs: one layer elegance

Thanks for visiting today
Claire xx

Monday, 12 August 2013

Spring flowers

Good morning my lovelies, I've had these gorgeous spring flower stamps by Sheena Douglass for a while now and not used them so I decided to have a play and alter this mannequin.

I have the mannequin a coat of Maimeri gesso and then a coat of cream acrylic paint. The flowers were stamped on tissue paper with black stazon and painted with twinkling h2os, cut out and then applied to the mannequin with Maimeri Matte Gel Medium. I love daffodils and bluebells, they are so pretty so I couldn't resist these stamps. 


Next I applied Maimeri light modelling paste and once that was dry, highlighted it with Treasure gold. I added a 'skirt' made from tulle and lace from the Ribbon Girl, a velvet ribbon bow with a pearl buckle and some flowers. The blue flowers are from WOC and the yellow roses were made with UTEE.

I'm entering this in the followng challenges:
Crafty Ribbons: anything goes with ribbon
Lady Bug Crafts: something floral
Paper Craftng journey: distressed/vintage


thanks for popping by, have a great day
Claire xx

Thursday, 25 July 2013

Violet Mirror

Good morning my lovelies, goodness me it seems to be getting hotter and hotter. I'm not complaining though as its lovely to see the sunshine, just not so good being cooped up at work in the gorgeous weather when I could be at home in the garden with my fur babies. I've got an altered mirror to share this morning.


The background was created with acrylic stamped, a coat of cream and then dry brushed with a very pale lilac and overstamped with an Indigo Blu fabric texture stamp. The violet stamp is from Sheena Douglass, painted with twinkling h2os. The sentiment is from the same stamp set. To finish off I've added treasure gold around the edges and a couple of indigo blu butterflies stamped on acetate and embossed in gold.

I'm entering this one in the following challenges:
Craft Room Challenge: Heat embossing
Daring Cardmakers: paint effects
Sparkle and sprinkle: anything but a card

Thanks so much for popping by today
Claire xx

Tuesday, 28 May 2013

A lightbulb moment ....

Good morning folks, my card today feature the gorgeous new 'Punky flowers' from Chocolate Baroque, they are on special offer this month so they are a real bargain. I just love these quirky designs and this stamp is such fun and of course they are on special offer as this months new stamps too!


I've made a background using distress inks and stamped the cogs from Punky romance with water and blotted with kitchen towel. I've stamped the image and painted with twinkling H2Os, I created the glow around the lightbulbs by adding lots of water to the paint and letting it spread around the image. Once the paint was dry, I added distress ink in black soot and chipped sapphire around the image. The light bulbs have been glazed with glossy accents but it doesn't show up too well in the photo. To finish off i've added a red bow and a couple of transistors from the box of goodies I found in the shed.


i'm entering this card in the following challenges:
amusing Challenges: anything goes
Crazy 4 challenges: no patterned paper
Rogue Redhead: May flowers
Without words: floral

Its heaven to get up and not have to rush off to work, I'm soooooo going to make the most of my week off and as its been raining thats all the excuse I need to leave the weeds and play in my craft room lol. Hope you have a good day and hanks for popping by 
Claire xx


Wednesday, 8 May 2013

Punky Flowers from Chocolate Baroque

Good morning, have you seen the new 'Punky Flowers' stamps from Chocolate Baroque, they are fab-u-lous! I love steampunk and these flowers have got such a beautiful quirky steampunk feel I think they are going to be a firm favourite!


As soon as I saw this little 'desk lamp' flower I thought of snowdrops and set to with my distress inks to create the background. The image has been stamped and embossed and painted with Twinkling H20s and I've stamped the beautiful steampunk lacy border from 'Steampunkery' and embossed with a sparkly white EP.

I've kept the card fairly simple, embossing around the edge and matting on some green card. I created the card blank with a Martha Stewart punch and to finish off added some white ribbon and a pretty button. 

I'm entering this card in the following challenges:
Addicted to stamps: beautiful button
Card Mania: flowers
Craft your Passion: floral delights
Paper Playtime: embossing
Ribbon Girls: add a button
Without Words: floral

Thanks for popping by 
Claire xx

Thursday, 31 January 2013

Fuchsia Heart by Chocolate Baroque

Good morning all, its blowing a right gale here this morning. I'll look like I've been dragged through a hedge backwards by the time I get to work (nothing new there then lol) My project today is another sample using the gorgeous Fuchsia Baroque Heart stamp from Chocolate Baroque. 

I've made a little wall hanging. I stamped the image and embossed with WOW gold EP and painted the image with twinking H20s before die cutting with a circular die. I cut two larger circles and then inked all the edges with shades of purple ink. I found some lovely lace with a heart design in my stash so I attached that to the back of one of the large circles using my hot glue gun, ruffling the lace as I went along. I also attached a purple tassel and a loop of gold cord as a hanger. I popped on the focal image using pva glue and lastly used the other large circle to cover the back.

I'm entering this project in the following challenges:
Bearly Mine: Hearts galore
Crafts and Me: Favourite Embellie
 (got to be lace at the minute but I do love tassels too)
Deep Ocean: love and lace
Loves Rubber Stamps: have a heart
Penny's Papercrafty: For the girls

Well just for a change I'm chasing my tail getting ready for work so I'd better go and brave the elements. Have a good day and thanks for popping by
Claire xx


Monday, 10 December 2012

Steampunk Rose from Chocolate Baroque

Hi there, Monday morning already and for those who are a bit 'Christmassed out' here's a card made using the gorgeous riveted roses from 'Steampunk Butterfly' from Chocolate Baroque, combined with a few different background techniques


Silver is such a difficult colour to photograph so apologies for the quality of the pictures. 
The roses have been stamped and embossed with black detail embossing powder and painted with twinkling H2o paints and cut out. I've used silicone glue to layer them up over the nestie shape which features one of my favourite techniques (at the minute lol). its the 'riveted patchwork' technique - a really fun and easy technique. Just take snippets of Inkssentials foil tape, peel the backing off and stick them on some cardstock to create a patchwork effect. Then use whatever 'tools' you have handy to create a riveted effect along the edges - I don't have any of the little tools for working with metal so I used a pokey tool and a ballpoint pen. Once you've done this you can add colour with alcohol inks if you want but I just die cut the shape and then brushed over with some black acrylic paint and wiped it with a baby wipe to give a slightly aged look. You can see the effect a little better in this photo.


The next layer is made using kraft glassine, which I marbled using distress stains (I used ~Brushed Pewter, Picket Fence and a little Black Soot) I then crumpled the sheet of glassine and dried it with my heat gun to seal the colour.  Next I swiped the sheet with my Black Soot distress inkpad to catch the texture and heat set it again.

The last background layer was created using the cogs fragment stamp from Steampunk Butterfly, stamped with versamark and embossed with silver embossing powder and then coloured with Brushed Pewter distress stain and a little black soot.

I've used black card for matting and layering and added some black late and silver ribbon. The gorgeous swirls are from the Die-namics Fancy Flourish die and I've made some rolled ribbon roses using red and silver ribbon.

I'm entering this card in the following challenges:
Card Makin Mamas: silver and/or gold
Just us Girls: embossing
Stamping Shack: sparkle and shine
Sweet STampin: dies and punches

Thanks for popping by today
Claire xx


Thursday, 18 October 2012

Gothic Fragments from Chocolate Baroque

Good morning, before I dash off to work I just wanted to share a canvas I've made using the beautiful new Gothic Fragments stamps from Chocolate Baroque, I've combined them with some old favourite stamps and lots of paint and ink :-)


I've used acrylic paints for the background and then applied texture paste through a Crafters Workshop Template and brushed with mica powder for some sparkle. The butterflies are made from acetate, the image was stamped and embossed with sparkly gold embossing powder and I added glitter to the reverse of the images. 


The images of the window and the turrets from Gothic fragments and the birds from Curly birds were all stamped on tissue paper, embossed with gold WOW embossing powder and painted with twinkling H2os'. I applied them to the canvas with Matte Multimedium


To add a little more sparkle I created my own version of the encrusted jewel technique by sprinkling on   gold, violet and pearl Embossing powders, little star sequins and lots of glitter, I then heated from underneath to melt the embossing powder.

I'm entering this in the following challenges:
Anything Goes: make your own embellishments
One Stop Craft: Heat embossing
Top Tip Tuesday: Things with wings
Simon Says Stamp and Show: Your favourite (paint and ink and lots of texture)
The Stamp Man: butterflies, birds and bees
Sugar Creek Hollow: show some sparkle

Thanks for popping by
Claire xx


Related Posts Plugin for WordPress, Blogger...