My lovely blogland friends

Showing posts with label Memory Box. Show all posts

Wednesday, 23 March 2016

Stamp Soup from Polkadoodles

Good morning folks, did you catch Nikky on C&C with the gorgeous Stamp Soup clear stamp sets and the fab new Lemonade Fizz and Lavender Tea CD collections? Wow they sold like hot cakes but if you pop over to the Polkadoodles shop you may find a few goodies left.


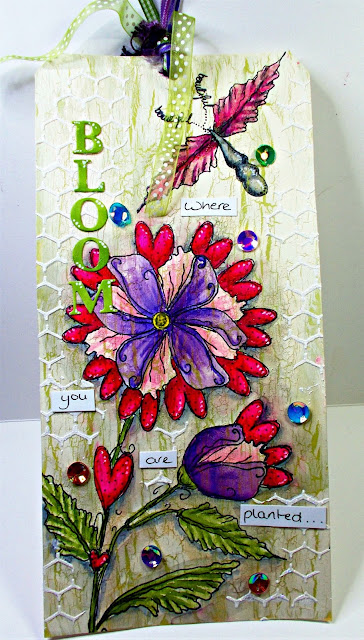
I've made a large tag using just the stamps. I began by creating a pva crackle background using emulsion paint tester pots. Next I stamped my design using Memento Tuxedo Black Ink and lots of post it masks, these stamps are all separate elements so you can have loads of fun creating your own flowers. You can also us them for lots of other things, the DT came up with lots of fun ideas including butterflies, dragonflies, birds, owls, hedgehog and a fairy. I got busy colouring with my Graph'It Markers. I wasn't sure how the colours would take on this kind of background but they are beautifully vibrant. I added some shadows with grey markers and some highlights with a white Graph'It Shake pen.


Next I stencilled the background using a Dutch Doobadoo Chicken Wire stencil and texture paste. I die cut the word 'bloom' using a Memory Box die and coloured the letters with Graph'it 8245 and wrote the rest of the words on scraps of paper. To finish off I've added some pretty irridescent sequins and some scraps of ribbon.

I'm entering this tag in the following challenges:
Fussy and Fancy: things with wings
Really Reasonable Ribbon: Welcome Spring plus ribbon
Stamping Sensations: Flower Power

Thanks so much for visiting today
 Claire xx

Friday, 26 June 2015

Pink and Pretty at Graph'It Colouring Challenge

Good mornin folks, a very quick post from me today as i'm a busy bee this weekend! Its inspiration week at Graph'it colouring challenge and our theme is 'Pink and Pretty'. We've got gorgeous Graph'it goodies up for grabs plus some amazing digis from East Wind! She's called Lucy Loo star Struck, isn't she a beauty?


We're adding a twist to the challenge for DT members and to spice things up we're all working from a colour palette, here's mine for this card:

ceramic tones

And here's a close up of Lucy Loo, for a full list of the colours i've used pop over to the challenge blog.


i've added some pretty papers from Craftwork cards, lots of die cuts, ribbon, lace ad pearls.
Thanks for popping by today
Claire xx

Friday, 29 August 2014

Christmas Cheer at Polkadoodles

Morning folks, Friday at last and the weekend is nearly here which means it's Polkadoodles Day lol. My card this morning is for our inspiration post at Polkadoodles for our theme is 'Get Organised for Christmas' so a great opportunity to get ahead with your Christmas cards.


I haven't used a Christmas cd for my DT project, I was having so much fun colouring the images from Work and Play 6 that I decided to make a fun Christmas card with the cute little barman image. Its so hard to make Christmas cards for young men, my son and his friends are a real headache to make cards for but they all looooooove beer so I thought a pint of Christmas cheer would make them smile lol.

It was a quick and easy card to make, the beer glass is one of the precoloured embellies on the Cd but they are such good quality you can print them out really big and they still look fab.  I layered the beer up on folded brown card and cut it out carefully not cutting the top to keep the fold. I added some pva glue and clear microbeads for some froth on top of the pint.

I coloured the image with Graph'It markers and layered it up on brown cardstock, added some Christmassy trim from my stash for tinsel and all that was left was to die cut some letters, colour them up with my Graph'Its and emboss them before popping them on the card.

I'm entering this card in the following challenges:
ABC Christmas: quick and easy
Aud Sentiments: any sentiment other than birthday
Crafty Girls: anything goes
Penny's Paper Crafty: Christmas or children
Top Tip Tuesday: anything goes

Well i'd better go and get ready for work, have a great day and thanks for popping by
Claire xx

Sunday, 20 July 2014

More inspiration at PanPastel UK

Good morning folks, how's your weekend going? We've had lots of lovely sunshine and now we're getting the thunder storms, I got totally drenched yesterday when I went out so today I'm playing safe and going no further than my craft room lol. Today's project is my inspiration piece for our Inspired by Tim challenge at PanPastel UK


I've taken inspiration from the talented Mr Holtz for my wall hanging and used lots of distressing and texture on this project which began life as a piece of MDF.

I began with a coat of Maimeri Gesso, and dried it with heat gun to bubble it a little here and there. Next I applied Maimieri Light Modelling Paste through a Dutch Doobadoo Chicken Wire stencil. Once that was dry I set to adding some colour with gesso and mixing in PanPastels in Magenta Tint, Diarylide Yellow Tint, Yellow Green, and Turquoise. I just scrape a little PanPastel out onto the gesso and mixed it on the project. Once all that was dry I applied a little Maimeri Acrylic Paint in platinum white for some shimmer and then dabbed a little brown PanPastel to distress here and there

The next layer was cut from corrugated card which I distressed and painted with watered down gesso.

Next I added the die cut letters which I coloured with Yellow Green PanPastel and then brushed on Maimeri Glassy Gel and sprinkled with glamour dust. I stamped the rest of the words with Bamboo Leaves Memento ink and cut them out.


Next came lots of die cut flowers made using the same  PanPastel tints, stamped with distress inks in coordinating shades and die cut. I adore these flower stamps and dies, I've been very good lately but my stash diet bit the dust and I gave in as I just couldn't resist these Arianna Blooms stamps and dies from Heartfelt Creations.

To finish off I added pearls, laser art Butterflies from Dutch Doobadoo and some die cut leaves. Hmmmm maybe I should have added some ribbon too.

I'm entering this project in the following challenges:
Altered Eclectics: anything goes
A Vintage journey: dies and distress
Country View Crafts: stencil it
Fab'n'Funky: summer
Just Inspirational: Shabby Chic
Love to Create: Petals and pearls 
Stamplorations: stamps and glitter

Well I'm away to play in my craft room, I'm escaping my usual Sunday ironing as its far too hot (that's my excuse and I'm sticking to it lol)
Thanks so much for visiting today
Claire xx
Monday, 14 July 2014

Discover your passion

Good morning folks, today is the first proper day of my week off work and it looks like its going to be a lovely sunny one so hopefully I'll be able to laze around in the garden and enjoy the sunshine. My project today is my entry for this months challenge at Indigo Blu where the theme is Tag You're It

I've used lots of different Indigo Blu stamps for my tag, I began with a layer of turquoise tint and Permanent Green tint PanPastels and then stamped the border from 'Boadicea' along the left hand side in Memento Tuxedo Black and Bubbles Background along the other side using Versamark ink. I applied deeper shades of PanPastel over the versamark and coloured the border with Graph'it markers. Next I used Salty Ocean and Peacock feather distress inks through a harlequin stencil and applied  Maimeri Glassy Gel over the top. I removed the stencil and sprinkled with Glamour dust. You can see the sparkle a bit better in this pic


I stamped the sentiment from 'Discover your Passion' and embossed with silver EP. I added some little acetate flowers from my stash, die cut butterflies and a rose I'd made with Tattered pine cones die and coloured with PanPastels. I also coloured some ribbon with PanPastels for the top of my tag, it looks a bit of a weird colour on the photo but its actually the same colour as the rose.

I'm also entering this tag in the following challenges:
Everybody Art: monochrome
Glitter'n'Sparkle: anything goes
Left of Centre: add sparkle
Sisterhood of Snarkystampers: brads and or buttons
That's Crafty: Stencils, masks and templates

Thanks for visiting today
Claire xx

Thursday, 26 June 2014

Baby card

Good morning folks, its a very exciting time as we've got a new baby in the family so over the last few weeks I've made a few baby cards as we weren't sure if it would be a boy or a girl. I don't often make baby cards but I really enjoyed making this one.


I've used an image that I won recently from Sami Stamps, I coloured the image with my Graph'It markers and paper pieced the shawl using a freebie backing paper. I die cut the image with a Spellbinders die ad added some distress ink (Squeezed Lemondae, Tumbled Glass and Spun Sugar). I used a coordinating paper for the background, distressed with a craft knife and the same distress inks. I die cut the letters for the word BABY with a memory box die, coloured them with my Graph'It markers and gave them a coat of glossy accents. To finish off i've added a seam binding bow, a little pram charm and a couple of paper flowers.

I'm entering this card in the following challenges:
Card Mania: babies
Digistamps for Joy: shaped cards
Glitter'n'Sparkle: include yellow
Simon Says Stamp: anything goes

have a great day and thanks for popping by
Claire xx

Thursday, 19 June 2014

GDT At Frilly and Funkie

Good morning, ooooh what an exciting day it is!! I'm a very lucky crafter as I'm Guest Designer at Frilly and Funkie, one of my very favourite challenges. Even better the challenge theme is absolutely fabulous too! The theme is 'Case it' and the idea is to case one of Linda's amazing Christmas tags but with a summery twist. Now I adore Linda's Christmas tags they are always so full of techniques and inspiration but I didn't get chance to play along last year so this was a perfect opportunity to catch up I took my inspiration from this one of Linda's tags


I began with a sheet of mountboard, distressed with a craft knife and Burnt Umber PanPastel. I followed the layout of Linda's tag and the idea of textured panels down the sides. I wanted a much more summery feel though so I set to work with Squeezed Lemonade, Shabby Shutters and Gathered twigs distress ink and a viva decor flexible stencil to create the flower panels. I cleaned the stencils and then applied a layer of Maimeri Glassy Gel, removed the stencil and sprinkled on microbeads (I know, I just can't stop using them at the minute lol).  Once it was all dry I added some colour to the background with PanPastels


The centre panel was made using a distress ink background on a tag, I used stamps from Crafty Individuals coloured with Graph'It markers, adding a die cut birdcage, lace, ribbon, pearl trim and a bird cage charm which I attached to the stamped glassine envelope


Again, following Linda's tag design I cut some burlap squares and gave them a light coat of gesso before attaching the letters (die cuts embossed with vintage silver Frantage powder)


Last but not least I added some flowers made with some scraps of linen card coloured with Magenta tint PanPastel. They were die cut with tattered florals and I added some glittery centres.

I'm entering this project in the following challenges:
Crafty Individuals: tag you're it
Die Cutting Diva's: thing with wings
Hobbycutz: anything goes
Rhedd and Rosie's: Anything goes

Thanks so much for popping by, do pop over and check out the gorgeous inspiration from the Frilly and Funkie DT as they such a lovely talented bunch of ladies!
Claire xx

Sunday, 17 November 2013

Shabby Chic Christmas at Fashionable Stamping Challenges

Hellooooo, hope you're having a good weekend. The last two weeks have whizzed by in the blink of an eye again and its time for a new challenge at Fashionable Stamping Challenges and this time our theme is Shabby Chic Christmas, there's a fab prize from our generous sponsor Flonzcraft so ink up those stamps and join us. Apols for the very dodgy pics, my card is actually pale green and white so you'll have to use your imagination lol.


The focal image is of course a stamp by Flonzcraft, stamped on kraft card with versamark and embossed with Shabby White EP. I made a frame with spellbinders dies and gave it a coat of gesso and then added some flitter glu and gin and tonic gilding flakes


The background started life as a gorgeous backing paper from the Chocolate Baroque cd set Seasons Greetings, given the gesso treatment and overstamped with CB stamps and gilding flakes - i got a bit carried away at this point and nearly obliterated the paper lol. I've added some gorgeous lace from the Ribbon girl, some pretty holly leaf edged ribbon and white seambinding. Next came lots of snowflakes cut with an assortment of Marianne dies, some Memory Box Holly Vine die cuts and some little pearls and gems

I'm entering this card in the following challenges:
Bunny Zoe's: shabby chic/vintage
Crafty Catz: anything but a square
Crafty Hands: vintage
Creative Corner: let it snow
Fab'n'Funky: anything goes
Papertake Weekly: snow and ice
Shopping our Stash: use something already on your desk 
(mine is flitteglu which is always on my workdesk)
Stempelsonnen: Its snowing
Lots of snowy challenges there, we're forecast to have some snow this week, how exciting!! I just love snow :-)
thanks so much for visting, hope to see you again soon
Claire xx

Related Posts Plugin for WordPress, Blogger...