My lovely blogland friends

Sunday 28 September 2014

Fall Splendour at Craft a Scene

Hi there, my second post of the day with a card for our Fall Splendour challenge at Craft a Scene. You've only got a few days left to enter so you'd better be quick. There's loads of inspiration from my lovely teamies over on the challenge blog so if you're stuck for ideas pop over and have mosey round.


I've used distress inks and stamps from Sheena Douglass to create this card. I tore a sheet of copier paper to make a mask for my landscape and added lots of rich yellows and oranges to create the sky and some halloweeny purples for the hills. I inked around the edges with black ink and then got busy stamping. I used memento tuxedo black in for all the foliage and the fences but for some real Autumn Splendour I stamped the tree in versamark and embossed with Japanese Laquer EP from Sparkle'n'Sprinkly, its a gorgeous red/black colour in real life.
I've added a little owl charm, a seam binding bow and a paper flower to finish off.

I'm entering this card in the following challenges:
Daring Cardmakers: autumnal forest
Paper Creators Crafts: use a charm
Sister Act: anything goes

Thanks for popping by, have a great day
Claire xx

Embossing Inspiration at PanPastel UK

Good morning folks, hope you're having a fab weekend. I've been a busy bee so far but I'm hoping to have a lazy day today. My project this morning is for PanPastel UK, its the second week of our 'Embossing' Challenge so you've still got another week to play along to be in with a chance of winning some gorgeous goodies from Premium Craft Brands.


I've made a little gift box using a template from a Dreamees Cd. I've used the gorgeous A4 leaves stencil to emboss the panels used to decorate the box and added colour with Light Gold, Rich Gold, Copper and Bronze PanPastels along with some of my favourite Bright Yellow Green Shade. The sentiment and butterfly stamps are from the Postcard A5 Stamp set


I've used black card as my base, it gives a gorgeous rich colour with the PanPastels. I've embossed the sentiment in gold ep and added some gold PanPastel around the torn edges. The butterfly was stamped in versamark and coloured with shades of the metallic PanPastels and cut out.


I've also used my metallic pans to colour the flowers and added some ribbon from my stash to finish off.

I'm entering this card in the following challenges:
Crafting for all seasons: Shades of Autumn
Open Minded: autumn

Have a great day and thanks for popping by
Claire xx


Saturday 27 September 2014

Stained Glass Angel from Chocolate Baroque

Good morning my lovelies, the weekend is here at last so hopefully that means lots of playtime! Today's card is one of my samples with the gorgeous new Christmas stamps from Chocolate Baroque, you can find them all here. The angel is a real beauty, she's from 'A Child is Born'


I wanted to give the impression of the angel coming to life and flying out of the stained glass windows so I began by stamping the window fragments and embossing with Gold embossing powder. I used distress inks around the edges, starting with Faded Jeans and then adding Stormy sky and then Chipped Sapphire. I painted the glass in the windows with twinkling H20 paints and then stamped the snowflakes in the corners and the sentiment (from Christmas Magic)  and embossed with gold.


I stamped the angel with Memento Tuxedo Black ink and coloured her with Graph'It markers before cutting her out and layering her over the background with 3d foam pads.

I'm entering this card in the following challenges
Hobbybook: embossing
Inky Chicks: anything goes
Inky Impressions: anything goes
Winter Wonderland: layer it up
Thanks so much for visiting today
Claire xx

Friday 26 September 2014

Sketch Inspiration at Polkadoodles

Good morning my lovelies and thank goodness its Friday!!! Today's is my DT project for our Sketch challenge at Polkadoodles. You've still got a week to enter to be in with the chance of a fabby prize so pop over to the challenge blog for all the details and while you're there check out the gorgeous projects from my lovely teamies!


I've used one of the gorgeous digital images from the Work and Play Festive Hollybobs collections, (you can also find her as a digital stamp here if you're not a cd crafter) I've layered her over an image of Christmas presents in publisher and then printed her on Ultimate Graphic paper before colouring with my Graph'It markers. The papers, ticket sentiments and paper bow are all from the same cd. I've used kraft card for layering and added some lace, ribbon and pearls from my stash.

I'm entering this card in the following challenges:
ABC Christmas: Something festive
Crafty Cardmakers: ribbon/lace/pearls
Crafty Sentiments: Christmas in September
Holly Jolly Christmas: ribbon/lace
Penny's Paper Crafty: spots and stripes

Thanks so much for visiting today, hope to see you again soon
Claire xx

Wednesday 24 September 2014

Hello Autumn!

Good morning folks, how's your week going? I love Wednedays, its my favourite day at work as I know its down hill to weekend lol. My card today is just for fun, my mojo has been awol and I've had a bit of a struggle to get into DT work so I decided to just have a play with this gorgeous freebie Tiddly Inks stamp and papers from Quick Cards made Easy.


I've coloured the lovely image with my Graph'It Markers, layered up on some kraft card and then used the pretty free papers to cover a shaped card blank. I used some more of the papers to make some paper flowers using Heartfelt Creations dies and  popped some beads in the centres.


I've added raffia lace, seam binding ribbon and a scruffy bow of raffia ad ribbon topped with a wooden button and some twine.

I'm entering this card in the following challenges:
Bearly Mine: Autumn colours
Creatalicious: flower power
Cutie Pie: cute with shades of Autumn
Die Cutting Divas: Anything fall
Incy Wincy: anything goes
Paper Minutes: colours of Autumn
Sweet Stampin: favourite embellishments (ribbon and buttons)

Have a great day and thanks for popping by
Claire xx


Sunday 21 September 2014

Trees with Autumn Colours at Fashionable Stamping Challenges

Hi there folks, I'm running a bit late with my DT card for Fashionable Stamping Challenges, its not bloggers fault this time lol. I thought the new challenge started next week, so I seem to have lost a full week somewhere. Anyway better late than never, our theme this time around is 'Trees with Autumn Colours' and we've got a fab prize of a $20 voucher for Flonzcraft so I hope you're going to play along with us. Don't forget we're a stamping challenge though so no digis allowed!


For my card I've made background using the cling film technique and distress stains/glimmer mists overstamped with some gorgeous leaves from Heartfelt Creations. The focal image is from Chocolate Baroque, stamped with Memento Rich Cocoa and coloured with both Graph'It markers and Inkense pencils. I've added some raffia lace, lots of leaves cut from scraps of the background card, some little berries and of course seam binding ribbon and a bow. 

I'm entering this card in the following challenges:
A Creative romance: anything goes
Allsorts: based on a film title (The Birds)
Craft Room Challenge: Forest Friends
Crafty Calendar: leaves and lace
Fantasy Stampers: autumn colours
Sweet Stampin: ribbons and bows
Vandicrafts: Autumn

Well i've got the ironing done, cooked lunch, walked the dogs and tidied up I definitely think its time to get inky in my craft room. If you've got a minute do pop over to the challenge blog and check out my teamies gorgeous projects
Thanks for popping by today, hope to see you again soon
Claire xx

Embossing at PanPastel UK

Good morning my lovelies, we've got a new challenge starting at PanPastel UK and our theme this time is 'Embossing' so dig out those embossing folders or dust off your heat gun and have a play to be in with a chance of winning some fab stash from our generous sponsors Premium Craft Brands!
You don't have to use PanPastels to play along but of course we love it when you do.


I've used PanPastels in Yellow Green Shade, Burnt Sienna, Raw Umber and Rich Gold to create this faux leather notebook using kraft cardstock. I've followed Sheena Douglass's technique using glycerine to create the faux leather and then embossed with the gorgeous A4 Leaves Stencil before applying my PanPastels. I used Maimeri Mat Gel Medium to seal and then lined the inside with fabric. The sentiment at the bottom is from Chocolate Baroque, stamped on tissue paper and applied with my Matte gel medium. I used a grungeboard shape at the top, embossed with gold EP. The inside was painted with Platinum White Maimeri Acrylic paint, stamped with a Heartfelt Creations sentiment and topped with crackle medium.


I'm far to lazy to sew the notebook inside so I took the easy option and cut a little shopping list book down and glued it inside. Lastly I made a ribbon fastener using seam binding ribbon, a spellbinders die cut coloured with PanPastels and a few flowers topped off with a button and a twine bow.

I'm entering this project in the following challenges:
Bearly Mine: autumn colours
Crafting for all seasons: colours of Autumn
Cute Card Thursday: Awesome Autumn
Divas by Design: anything but a card
Milk/Coffee challenge: colours of Autumn
Simply Create Too: Fall/Autumn

Thanks for popping by, have a great day and hope to see you again soon
Claire xx

Saturday 20 September 2014

Something Masculine at We Do Doobadoo

Good morning my lovelies and a big warm welcome to my new followers, its a real pleasure to 'meet' you. Its Saturday so I'm hoping to have lots of time in my craft room but before I go and play here's my project for our new challenge at We Do Doobadoo and this time around our theme is 'Something Masculine'. As always you don't have to use Dutch Doobadoo products to join in and our lucky winner will receive some gorgeous Doobadoo goodies so I hope you're going to play along with us.


I've altered an MDF clock blank for my DT project. You may notice that it isn't a finished clock, that's because I can't find any clock mechanisms anywhere, I'm sure there is a black hole in my craft room lol. Anyway I began with a coat of Maimeri Gesso, then added lots of texture with Maimeri Light Modelling Paste and some of my favourite Dutch Doobadoo stencils (I used Metal 2 and Barbed Wire). Once that was dry I glued on some of the Kraft Art Stars and Arrows. and then gave the whole thing a coat of black acrylic paint. I used Maimeri Acrylic paints in Deep Gold, Light Gold and Bronze (the bronze is my favourite colour ever, its gorgeous. I also blended in a little green here and there and then once it was dry I dry brushed black here and there too.


For the inside i used a piece of greyboard and primed with Maimeri White Gesso and added some more texture with a Dutch Doobadoo burlap stencil and more Light Modelling Paste. Next I added a coat of Platinim White Maimeri Acrylic, and mixed in some PanPastels. The stamps are all from Chocolate Baroque, stamped with Potting Soil Archival onto tissue, coloured with distress markers and attached to the project with Maimeri Mat Gel medium. The letters were die cuts, again painted with Maimeri acrylics. To finish off I've added some highlights with some Treasure Gold.

I'm entering this project in the following challenges:
Artistic Stamper: Autumn Colours
Aud Sentiments: for the men in our life
Divas by Design: anything but a card
Rhedd's Creative Spirit: Anything Mixed Media
STAMPlorations: Stamps and markers
The Mirror Crack'd: anything goes mixed media

Have a lovely crafty day folks, thanks for visiting and hope to see you again soon
Claire xx


Friday 19 September 2014

Light Source or Pink at Graph'It Colouring Challenge

Morning my lovelies, Friday at last and the weekend is nearly here yipppeeee! Its also time for a new challenge over at Graph'It Colouring Challenge and Nikky has really made us DT girls get our thinking caps on as she challenged us with the theme of light source eeeek! She's not that mean to you guys though as you have the option of pink as the challenge theme (unless you're feeling brave and want to try the light source lol). As always there's a prize of gorgeous Graph'It goodies for our lucky winner so don't miss out on your chance to win!


I've coloured a Sweet Pea christmas stamp for my DT card, it was a real challenge with all those candles lol. Pop over to the challenge blog for a full list of all the colours. I've created a background with stamps from Chocolate Baroque and the gorgeous new Pearl PanPastels in blue and green. I've layered the up on a shaped and embossed card blank and added some ribbon, holly die cuts, little white berries, a pearl slider and a snowflake charm.

I'm entering card in the following challenges:
ABC Christmas: something festive
Crafty Cardmakers: ribbon/lace and pearls
Holly Jolly Christmas: ribbon or lace 
Incy wincy: shaped cards
One Sweet Challenge: holidays are coming
Paper Shelter: ribbon/twine/floss

Thanks so much for visiting today, hope to see you again soon
Claire xx

Thursday 18 September 2014

Meet Winston from Polkadoodles

Good morning folks, well I'm sure you've all seen lots of this adorable little chap in blogland but this is the first chance I've had to post one of my Winston makes. Winston is Nikky Hall's latest addition to the Polkadoodles family, he's such a cute little Teddy and his friend Etty is just adorable, you can find them both and lots of gorgeous goodies on the Winston CD Collection


I decided to make one of these cute pop up box cards but I wanted to make it a bit bigger than usual so I used two A4 sheets of kraft card to create my box. The image is one of the digistamps from the CD (all the images also come precoloured too so they are fab for quick cards)
I coloured the image with Graph'It markers and then set too cutting out loads of flowers, paper bows and various embellies from the CD


I covered the box with a couple of the lovely backing papers from the CD, there are so many it was really hard to choose lol. I then added all my flowers and embellies and  couple of sentiments from the CD. The only thing I added was a few little bows made using some garden twine.

I'm entering this card in the following challenges:
Creatalicious: flower power
Creative Corner: masculine
Incy Wincy: Shaped cards
Inky Chicks: anything goes
Oh La La: birthday boy

Thanks so much for visiting today, hope to see you again soon
Claire xx

Wednesday 17 September 2014

Snowy Penguins from Chocolate Baroque

Good morning folks, today's card features Snowy Penguins, one of this month's new stamp releases from Chocolate Baroque.  As always my lovely teamies have got loads of inspiration so make sure you pop over to the Chocolate Baroque Design Team blog and have a peek.


I stamped the images with Memento Tuxedo Black ink, and added some colour with Graph'It markers before cutting them out and popping them on to a side step card. I've added a computer generated sentiment, some die cut snowflakes and icicles and then added lots of glitter for some snowy sparkle.

I'm entering this card in the following challenges:
4 Crafty Chicks: anything goes
Aud Sentiments: for the men in our life
Cards for Guys: no patterned paper
Christmas at Sweet Stampin: Christmas critters
Cuttlebug Mania: anything die cut
Jellypark: pets/animals
Winter Wonderland: boys will be boys

Thanks so much for visiting today, hope to see you again soon
Claire xx


Tuesday 16 September 2014

Sparkling Snowflakes from Chocolate Baroque

Good morning folks, how's your week going? I'm meeting myself coming back at work as usual but at least I'm not bored lol. Today's project is an early Christmas make using this month's new releases from Chocolate Baroque.
 I love the snowflakes on 'A child is born', they are such beautiful stamps I wanted to put them centre stage rather than use them for a background so I've made a little bag charm and matching gift box.


To make the gift box I took a paper mache book box and applied texture paste around the side, while it was wet I ran a comb along the edge to create 'pages' and left it to dry. Once it was dry I gave the box a couple of coats of off white emulsion paint and again left it to dry.

While the paint was drying I stamped the snowflakes on to tissue with versamark and embossed with Wow Gold Sparkle embossing powder, this powder is just soooooo sparkly the pics really don't do it justice at all.I cut them out and then peeled off the top layer of the tissue. I applied the tissue snowflakes to the box with matte medium and again left it to dry thoroughly. To finish off I've embossed all the edges with gold embossing powder.

Here's a view of the inside of the box


To make the bag charm I took a copper blank and painted with white acrylic paint. Once the paint was dry I stamped and embossed the snowflakes and then carefully applied a clear two part resin (Glossy accents doesn't work for this technique, it goes a gloopy greeny turquoise colour,don't ask how I know haha). I was planing on adding some beaded snowflakes but I'm so slow at beadwork these days they may not be ready until next Christmas lol.


I'm entering this project in the following challenges:
Artistic Inspirations: anything goes/bling
Completely Christmas: anything goes
Crafty Little Fairies: sparkle/bling
Hobbycutz: gold/silver
Rhedd's Creative Spirit: anything goes altered art
WOW Embossing powders: My favourite 

Thanks so much for visiting today
Claire xx


Monday 15 September 2014

Guest Designer at Country View Crafts Challenge

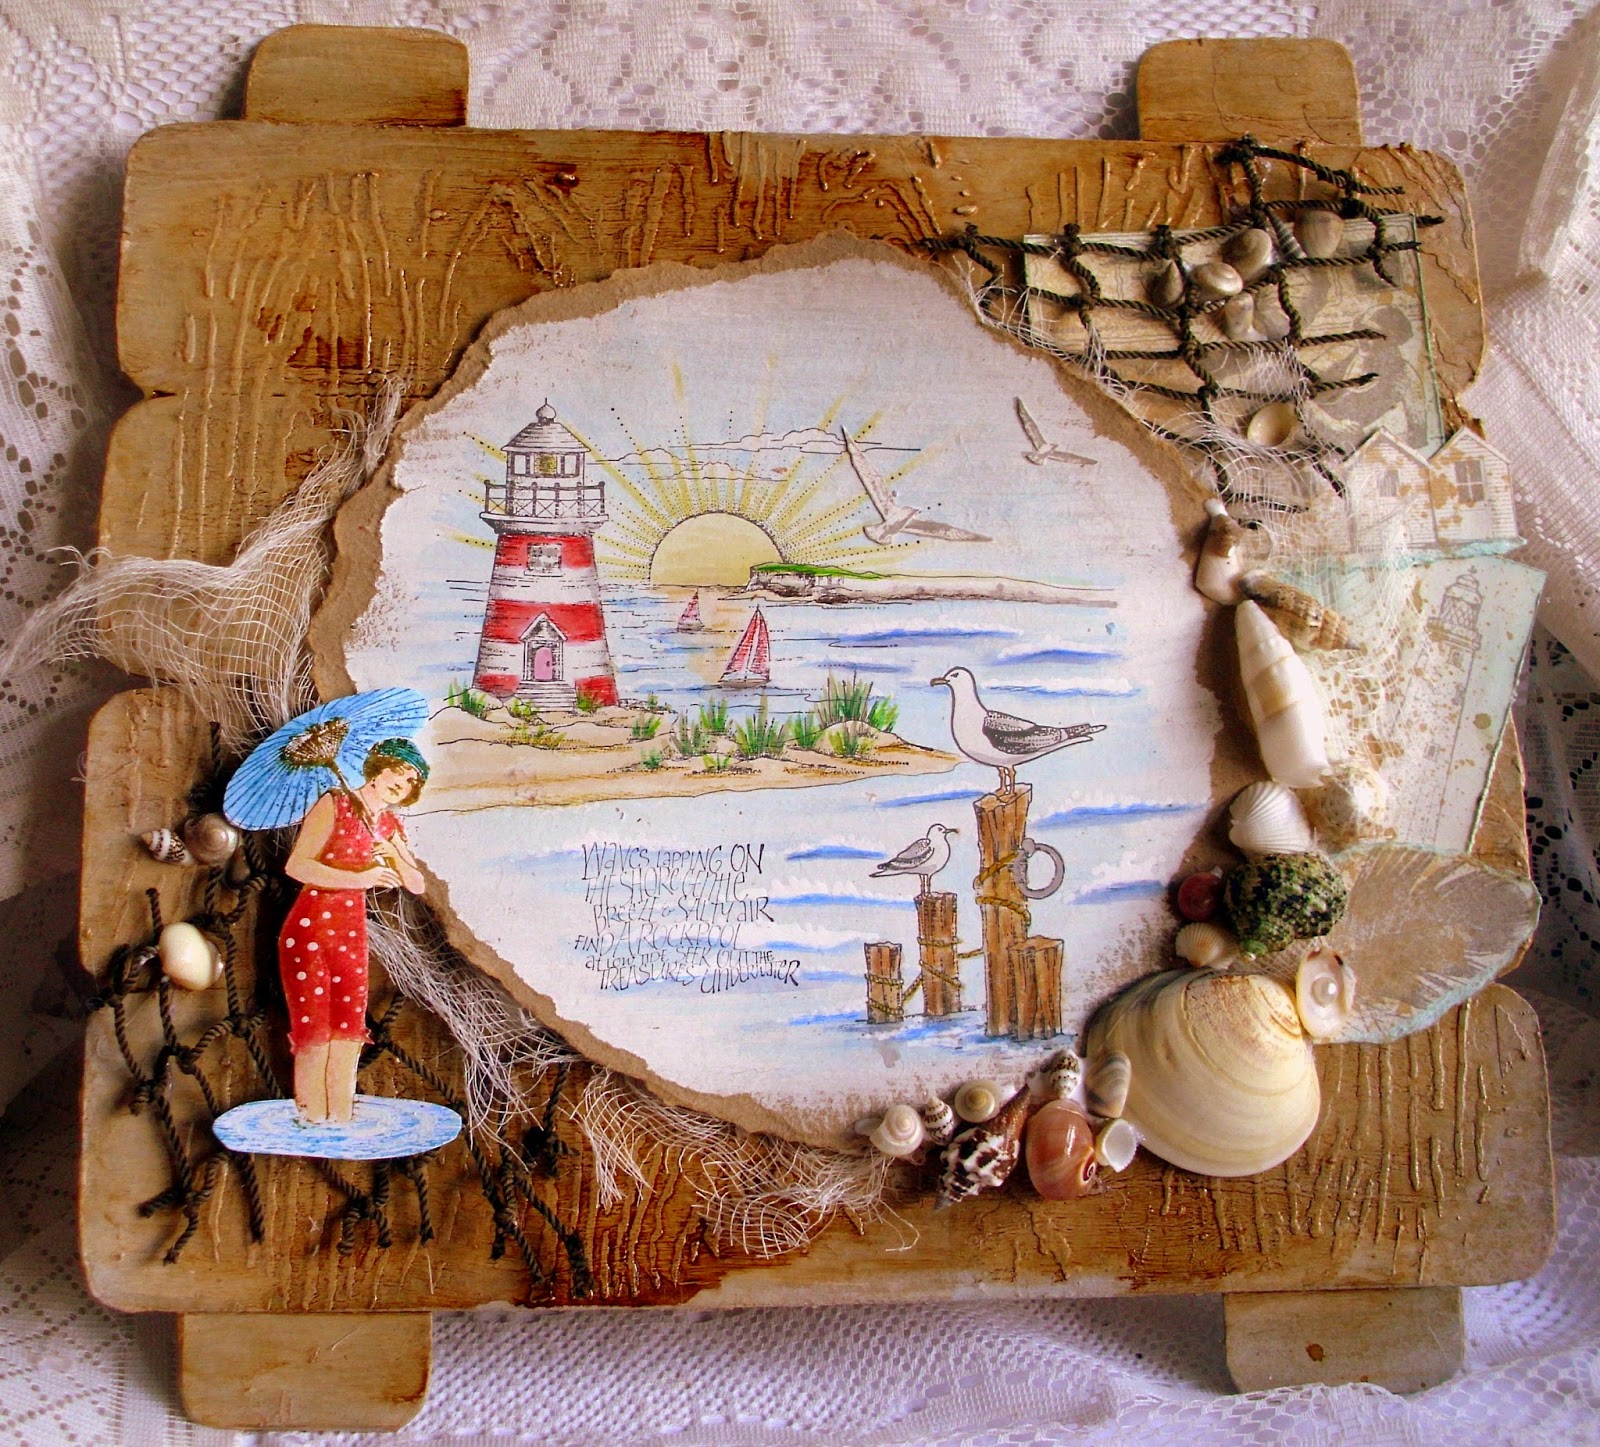
Good morning folks, Monday morning already!! Its a very exciting day for me as I'm over the moon to be joining the talented team at Country View Challenges and a Guest Designer for their 'Nautical Challenge'. If you've got time,do pop over and have a look as the team always have some amazing inspiration!


For my project I made the base using mountboard (I'd seen them on C&C and decided to have a go at making my own) and created some texture with a Crafters Workshop woodgrain stencil and Maimeri Light modelling paste. I added some colour with acrylic paints, distress stains and added some coffee for a bit more depth here and there.

The focal scene was made using stamps from Chocolate Baroque stamped on kraft card painted with gesso. I've coloured the scene with Derwent Coloursoft pencilsand then tore the edges.


I stamped the sentiment and seagulls in the sky using stamps from Crafty Individuals and layered the scene up over some cheesecloth and some netting. Next came more stamping,with a selection of postcards and seaside images from Crafty Individuals stamped on coffee misted card and popped under the right hand side of the scene. I added the lovely bathing belle (also from Crafty Individuals) and coloured with Graph'It Markers to the left hand side of the scene.


To finish off I've added lots of little shells


I'm entering this project in the following challenges:
Deep Ocean: Vintage
Sentimental Sundays: a touch of vintage
Treasured Times: Anything goes
Wags'n'Whiskers: for the girls

Thanks for popping by today, hope to see you again soon
Claire xx

Sunday 14 September 2014

Frame it Inspiration at PanPastel UK

Good morning my lovelies, we've got some 'Frame it' inspiration over at PanPastel UK this morning. As always you don't have to use Pans to play along and you could win some lovely crafty goodies from our sponsor Premium Craft Brands! For my DT project i've altered a collage frame.


I gave the frame a base coat of Maimeri Gesso and added some texture with Light modelling paste and a harlequin stencil. I used shades of blue and green PanPastels to add some colour including the gorgeous new Pearl PanPastels in Blue and Green. I used Raw Umber for a distressed look and also used some gilding wax to highlight the texture.

The scene is made with some gorgeous new stamps from Chocolate Baroque, 'Seaside Dreams', colouring the scene and shells with my PanPastels and Graph'it markers. I used the new PanPastel Colourless Blender on this project too, I didn't really think there was a need for a blender as Pans blend beautifully but its fab for skies, it blends the colour out without losing any of the clarity of colour. If you want to check out my tutorial for creating clouds with PanPastels you can find it here.


I added some 'sand' around the edges of the scene using Light Modelling Paste, Diarylide Yellow Shade/Burnt Sienna Pans and to finish off I applied Maimeri Glassy gel and glitter to the waves.

I'm entering this project in the following challenges:
Craft Room Challenge:something old something new
(New stamps and Pearl PanPastels, old stencil)
Kitty Bee Designs: In the sky
Left of Centre: No designer paper
Little Claire's: Summertime
Simon Says Stamp: make your own background

Thanks so much for popping by, hope to see you again soon
Claire xx


Related Posts Plugin for WordPress, Blogger...