My lovely blogland friends

Showing posts with label stickles. Show all posts

Saturday, 8 February 2014

Glasgow Wedding

Have you seen the new stamps at Chocolate Baroque this month? Oh my goodness they are absolutely gorgeous, there are two new sets of images, Mackintosh Beauty and Mackintosh Windows and some fab sentiments in the most gorgeous fonts too. This is is my first sample using them and I used both Mackintosh Beauty and Mackintosh Windows to make this card (you can find them here)


The image is stamped with Memento Tuxedo black ink and coloured with Graph'It Markers, I've added a little stickles to the centre of the roses and some faux gems in the corners. I've distressed the edges and layered the image up on black card. I added the lovely rose heart from the Mackintosh Beauty set, again coloured with Graph'It Markers.


The background was made with distress inks, I used Spun Sugar, Evergreen bough and a little Iced Spruce. I used tiny amounts of ink on my blending mat and spritzed with lots of water to get a very muted background. Once this ink was dry I overstamped with some of the Mackintosh Windows, stamping very lightly to give a hint of the design here and there. I've gone to town with lots of lace, ribbon, some rolled ribbon roses and some pretty bead string from my stash.


I decorated the inside to match, but kept to a very subtle colour palette, I made this before the new sentiments were released so I may have to make another lol. I really enjoyed making this card as these stamps are so pretty. I even decorated a box to match

I'm entering this card in the following challenges:

A Creative Romance: show us some love
Bearly Mine: vintage romance
Crafting for all Seasons: show us some romance
Get Inky: Valentine/Love
Little Miss Muffet: luuuuuuurve
Live and Love Crafts: Love'n'Lace

Thanks so much for popping by today, hope to see you again soon
Claire xx

Wednesday, 30 October 2013

Fancy Flourishes from Chocolate Baroque

Good morning my lovelies, todays card features the gorgeous new clear stamps from Chocolate Baroque, Fancy Flourishes  and a little topper made from Tim Holz tissue wrap. I adore this stamp set, such beautiful intricate designs.


I made the background by blending Dusty Concorde and  Milled Lavender distress inks onto some white cardstock. I stamped the flourish using Imperial Purple Versafine ink, its so easy to position these clear stamps. I made the topped by wrapping a little piece of card with tissue wrap, and adding some colour with more distress inks. I coloured the butterflies with Graph'It Markers and added some tiny dots of stickles to the wings before edging the topper with a gold krylon pen. I've just added a little bow and a die cut butterfly to finish off. I'm entering this card in the following challenges:
Crafty Bloggers: things with wings
Crafty Cardmakers: monochromatic purple
Fitztown: things with wings
Glitter 'n'sparkle: add some black
My time to craft: butterflies

Thanks for visiting today
Claire xx

Tuesday, 12 March 2013

Paint fusion poppies and daisies

Good morning folks, well after my long weekend off work my nose will be back to the grindstone this morning but before I venture out into the snow here's a quick couple of projects. Sorry about the pics, the light was really weird yesterday one minute it was bright sunshine the next black clouds and a blizzard. I've made a couple of mdf plaques that I got from Joanna Sheen and given them the paint fusion treatment.

This first project was inspired by the lovely Brenda's special celebration challenge. pop over and have a look here.  Brenda has been a very special inspiration to me so I had to have a play and enter. Brenda is so generous with her ideas but also unbelievable generous with her goodies - she is celebrating her 4th blogaversary with some really special prizes! Happy Blogaversary Brenda, we should really be giving you pressies for all the inspiration you share with us.

Anyway back to my project, I gave the mdf plaque a quick coat of magnolia emusion paint and then a light sanding. Next I stamped the poppies with black stazon and painted them with acrylic paint. Now this was meant to be a quick project and the painting didn't take long at all but the letters - what a nightmare! I decided that I wanted nice sparkly letters  and thought all i need is some lime stickles and a bit of glossy accents, easy peasy .... mmmmm maybe not! I cut the letters on my cricut, coloured them with promarkers and then added the stickles. Left them to dry and when i went back i was a 'p' short and i'd lost my apostrophe! So back to the cricut, promarkers and stickles, left them to dry and added the glossy accents. Now I'd lost the 'm' grrrrrrrrr. How annoying, even more when I'd made another 'm' and then found the first one stuck to my sleeve lol.


My second plaque was made in the same way using Sheena Douglass' daisy stamps. This time I added some little daisies I'd made with air dry clay.


I'm also entering the following challenges:
Addicted to stamps: bring on spring
all that stickles: any green stickles
Paper Crafting journey: anything but a card

Thanks for popping by,
have a lovely day 
Claire xx

Tuesday, 12 February 2013

Spring Foliage from Chocolate Baroque

Good morning folks, I've got a Spring themed project to share with you today although it certainly doesn't feel like Spring in my neck of the woods yet. I've used the gorgeous new Spring Foliage stamps from Chocolate Baroque for this card


I've used memento inks to brayer the background, on coated cardstock  Memento inks are my favourite for brayer work as they come is such beautiful clear colours. I've also used my Splodge Away Mat, which I absolutely love!! It makes brayer work sooooo much easier and saves wasting so much ink. I didn't do any masking at all as I wanted the stamps to do all the work. I just brayered green shades at the bottom of the image (New Sprout and Bamboo leaves) and at the top I used Dandelion, Tangelo and Rosebud to create a pinky peachy sky. I used the same colours on the background but this time I used plain cardstock and a blending tool to give a slightly different effect.

Next I stamped the foliage stamps using Bamboo leaves, repeat stamping before reinking to give some depth to the foliage. The butterflies (from Rose Tree) were made by stamping on acetate and  embossing with Gold embossing powder, next I cut them out and applied stickles  (I used Tropical Tangerine, Paprika and Lime Green) to the reverse side, left them to dry and then folded the wings up a little. Here's a better pic of the butterflies


The sentiment is stamped in brown Memento ink, its from Loving Sentiments and is one of my favourites, such lovely words and the font is gorgeous. I've used dark brown card for matting and layering. I didn't want to add a lot of embellishments so I added some green ribbon and a rose.

I'm entering this one in these challenges:
Artistic Inspirations: Anything goes
Brown Sugar: anything goes
Crafty Ribbons: anything goes with ribbon

Well I'd better get my skates on and go to work, have a good day folks and thanks for stopping by for a visit today.
Claire xx


Sunday, 22 July 2012

Mystical and Magical at PanPastel UK

Hi there, phew I'm chasing my tail at the minute with work, hubby in hospital and trying to do battle with the weeds when I get chance. Its great to grab some time in my craft room though and have a play and I had loads of messy fun making this card. Its my DT card for PanPastel UK where the theme is Mystical and Magical


The large fairy and castle stamps are from Stampendous, the smaller fairy and the toadstools are from Chocolate Baroque, I stamped them all and masked them to create the sky with panpastels. I also masked a moon too. I used black, paynes grey and violet to create the sky and added some icicle stickles for the stars. The moon was made using white panpastel with a little violet and paynes grey pans around the edges. I coloured the scene with distress markers and added lots of glamour dust, fairies have to have a bit of sparkle lol. You can see the fairy a bit better here in this pic


I'm entering this card in the following challenges:
Crafty Mess: sun/moon
Cute Card thursday: Fairy nice
Cutie Pie: Glitter and bling
Papertake weekly: all things girly
Southern Girls: angels or fantasy

Don't forget our lucky winner will receive a fab trial set of PanPastels from the lovely Berni at Your Creativity Store!


Thanks for popping by today. I hope you get chance to enjoy some sunshine, We've had the most dreaful weather over the last few months but yesterday the sun came out! Better make the most of it while it lasts lol
Claire 

Sunday, 20 March 2011

Daisies

Hi, I've been getting carried away with my new paint fusion stamps and I thought this daisy background would be perfect for this Sweet Pea stamp, Bess by Elaine Cox.

The main image is coloured with promarkers and Bess has crystal glaze on her eyes and dots of diamond stickles on the background. I've used silver embossing around the distressed edges and a layer of diamond stickles over the top for some extra sparkle. I've layered the image on some vellum punched with a doiley lace MS punch and again edged with stickles. The sentiment is a stamp from Whimsy stamps, I love these faux postage stamps as they come with a matching die to cut them out.

The background is stamped with Sheena Douglass' daisy paint fusion stamps and then painted with a selection of acrylic paints from my stash. I've edged the background with more silver EP and diamond stickles. You can find Sheena's fabby paint fusion goodies here
To finish the card off I've added some white chiffon ribbon, some feathery bits under the white bow for some extra texture  and  a butterfly charm from my stash.
I'm entering this card in the following challenges:
Bling it on: anything goes plus a charm
Charisma Cardz: To 'die' for
Crafts and me: photo inspiration plus texture
Crafty Cardmakers: make your own designer paper
Creative Cottage: Spring has sprung
Daring Cardmakers: Going postal
Do you stack up: Add a bow
If the Shoe Fits: Aquamarine
Sweet pea Stampers: Scallops (the vellum is punched with a scalloped edge)

Thanks for calling by today. I'm really going to have to put my paints down and start cooking Sunday lunch lol.
Claire xx

Saturday, 2 October 2010

Princess Oceana

Hi, I'm so pleased its the weekend at last. I think I've been working too hard as i've done some really daft things this week. I spent ages looking for a wedding invitation and eventually found it in the freezer lol. Thats just one thing, I've generally been totally scatterbrained all week. Definitely time to chill out and do some crafting lol

Last week Marion did a great tutorial for colouring red hair over on Michelle Perkett Studios, I used Marions technique to colour Princess Oceana and make this card. I love this image, she is Michelle's signature image and you can find her in Michelle's Etsy store here. If you're quick you'll be able to grab a bargain as Michelle has a sale on with 35% off to celebrate World Cardmaking day!!


I've used the sketch from Bunny Zoe'sCrafts  challenge for this card, did you know you can also get Michelle's images from Bunny Zoe's? The bps are from K&Co and I made the 3 panels by brayering a water effect on glossy card with dye ink, it doesn't show up too well on the pic though. I distressed the edges of the bps with a craft knife and spiced marmalade DI, it looks a funny colour in the pic for some reason (mmmm perhaps my terrible photography skills may have something to do with it lol)  I coloured Princess Oceana with promarkers and added stickles in various colours for some extra bling.  I made some flowers by cutting lots of circles of tissue paper, spraying them with glimmer mists and scrunching them up. I layered them up and added some tiny shells to the centres. I added some ribbon and larger shells from my stash to finish off.

I'm also entering Princess Oceana in the following challenges:

Paper Playtime: listen to the rhythm of the falling rain (the theme of water)
Totally Papercrafts: The great outdoors
Creative Cottage: bling it on
Your next stamp challenge: Make your own flowers
Simon says: It's Autumn (Photo inspiration and fall colours)
Little red Wagon: Make your own embellishment

Don 't forget you still have time to enter this weeks challenge at Michelle Perkett Studios which is 'Girly with Bling' and be in with a chance to win one of Michelle's gorgeous images!! If you don't have any of Michelle's images, you can find some lovely freebies over on PCP, SNR and CDAC!!

Thanks for popping by, have a good weekend
Claire xx

Sunday, 5 September 2010

Anything Goes at Cowgirl's Sunday Stamp'en Challenge!!

We've got a really easy challenge for you this week at Cowgirls Sunday Stamp'en Challenge - Anything Goes!! It doesn't get much easier than that does it lol. We have a fab sponsor too, Michelle Perkett who is giving the winner of our challenge 3 of the wonderful images from her store


The top 3 will also receive a prize too - they get to choose one of CJs fab images from Cowgirl Designs Stamp'en Ranch. The winner and Top 3 also get a badge for their blogs too!!


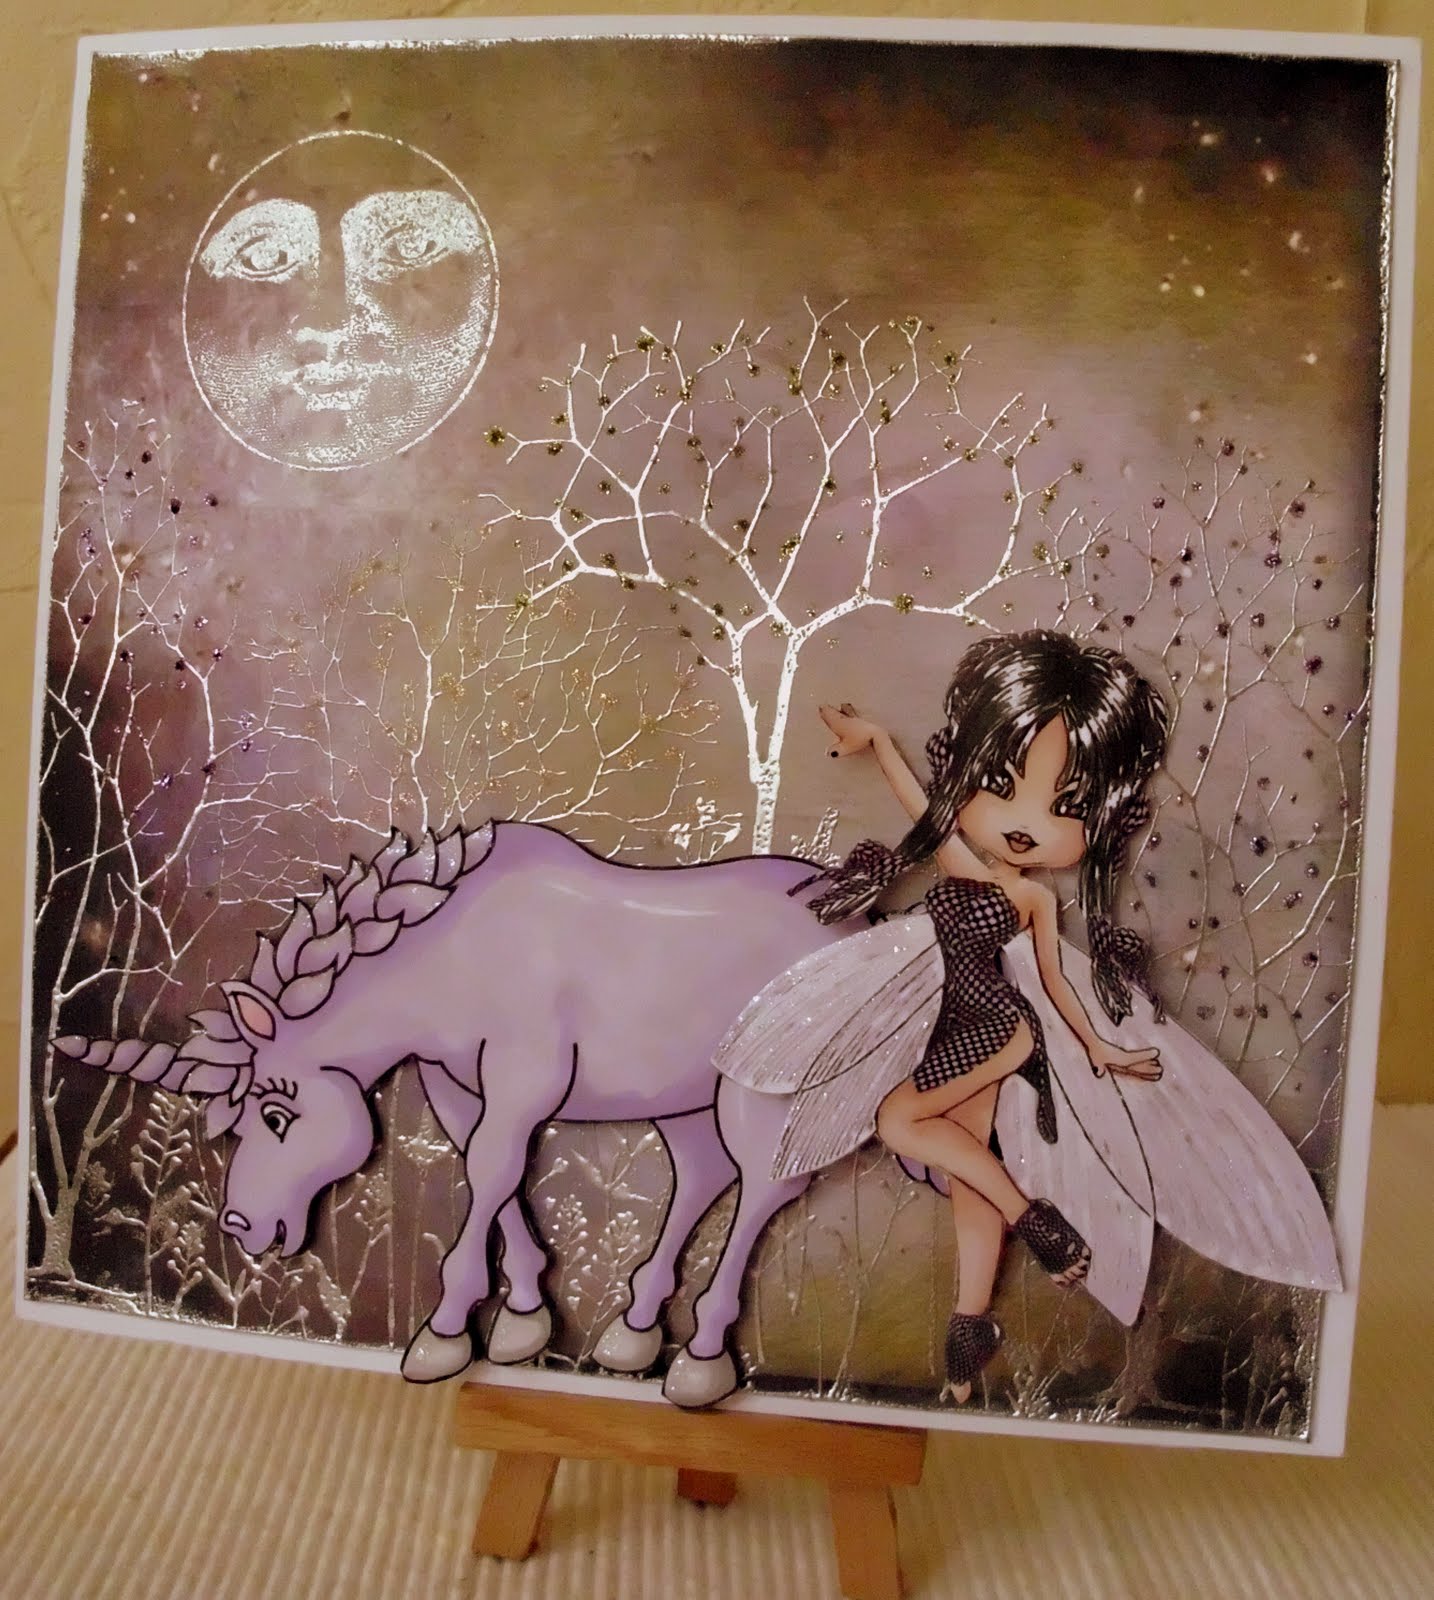
My card is made using 2 of CJs beautiful images - Check Faery and Unicorn both available here). They are both coloured with promarkers and have glitter highlights but they aren't showing up too well on the pic. The background is made using stamps from Elusive Images and Non Sequitur stamped onto a bp from Raspberry Road designs. The moon and trees are stamped and embossed with silver ep and the trees all have little dots of stickles for their leaves.

I'm entering my card in the following challenges:
I love Promarkers: Myth and Magic
Crafty Cardmakers: glitter and sparkle
Craft Your Days Away: Girly and Glitter
Oh Alice: Sparkle and Shine

Thanks for calling by, I'm looking forward to seeing your creations for our 'Anything Goes' challenge at Cowgirl's Sunday Stampen Challenge. Don't forget we have a 'Coming Home Campaign' challenge for you next week so that CJ can collect loads of Christmas cards for soldiers to send home to their loved ones -  we have some amazing sponsors lined up so you won't want to miss it!!
Claire xx

Tuesday, 24 August 2010

A little birdie....

This weeks challenge from Allsorts is to make a little something - less than 3" in size. I've had this tiny canvas for ages so this was a perfect opportunity to have a play


I used ecogreen paint in ocean and tidepool and blobbed them on the canvas before spreading them around with a palette knife for some texture, while the paint was wet I sprinkled on some glitter. Once the paint was dry, I stamped the little bird in a tree with black versafine. I painted a scrap of card with lime shimmery paint and stamped the bird again. I also applied some blobs of the lime paint to the tree and then some lime stickles. I attached the bird with some silicone glue for a little dimension and added some feathers (kindly donated by my parrot Sammy lol)

I'm entering my little canvas in the following challenges

Play Date Cafe: this gorgeous colour combo


Totally Stampalicious: Texture - licious!!
Tuesday Taggers - Inspired by a poem ( how about Ode to a Nightingale?)

Thanks for calling by, I hope you like my little canvas. We had blue sky and sunshine first thing but by 10.30 it was pouring with rain so I had to abandon my plans to do some weeding and potter in my craft room instead. What a shame lol.
Claire xx
Related Posts Plugin for WordPress, Blogger...