My lovely blogland friends

Showing posts with label Clarity Stamps. Show all posts

Wednesday, 1 March 2017

Spring Colours or Easter at Eclectic Ellapu

Hello my lovelies, how's your week going? I can't believe it's already 1st March, it only seems like 2 minutes since Christmas but hopefully March means longer days and warmer weather. It also means a new challenge over at Eclectic Ellapu where our theme this month is 'Spring Colours or Easter'.


I've made a card featuring a Spring scene using lots of different stamps. I began by stamping the dog (from Sheena Douglass) and masking with masking tissue. Then I used  a Clarity Stencil and some glimmer mists to create the blue sky and green hills. The clouds were made using a sponge and acrylic paint/ I stamped in the trees (from Chocolate Baroque). The foliage and mushrooms were stamped using Lavinia stamps and Memento inks. I coloured the dog with Lyra pencils and added some grass to bring the scene together. I used Gathered Twigs distress ink around the edges.

I'm entering this project in the following challenges:

Paper Shelter: Animal Magic
The Crazy Challenge: We love animals


Thanks so much for visiting today, hope to see you again soon
Claire xx

Wednesday, 17 August 2016

Chocolate Baroque Colour Challenge

Good morning folks, we've got a gorgeous colour palette to inspire you over at Chocolate Baroque Challenge blog and today I'm sharing the project I've made for inspiration.


The colour swatch is gorgeous and I thought it was a great excuse to use one of the beautiful new stamps from Chocolate Baroque, this lovely lady is called Summer Fair and she's gorgeous some beautiful sisters too , you can get the full set here.


I've used an Oval Basewood Plaque for the base of my project. After a coat of white gesso I created a crackle effect background by applying a coat of red acrylic paint, once that was dry I brushed on PVA glue and then a layer of cream paint. Once that was dry I applied a mixture of Maimeri Iridescent Paste and Gold acrylic paint through a stencil and again left it to dry. 

I coloured the focal image with Graph'It markers and cut her out before attaching her to the base. I've added raffia, dried flowers and a gingham bow topped with a paper poppy to finish off


I'm entering this project in the following challenges:

Country View Crafts: Hot summer days
Crafty Awesomeness: Anything goes with a coloured image
Pile it on: Make your own background
Really Reasonable Ribbon: anything but a card with ribbon/trim

Thanks so much for visiting today
Claire xx

Friday, 8 January 2016

Winter Blues and a Tutorial

Good morning my lovelies, Friday at last! I always find this time of year a bit of a drag but the weekend is here so I'm a happy bunny! We've got a fab challenge over at Graph'It Colouring Challenge and our theme is 'Winter Blues'. We've got some fab prizes up for grabs too, one lucky winner will receive a prize from East Wind (wow some fab images to choose from!) and another ill receive some gorgeous Graph'It Goodies from Cult Pens! I've used this fab East Wind image for this canvas, she's called Magnified Star and I really enjoyed colouring her. I've also used my GIs and glossy card to create the background, if you've got a min scroll down as I've done a tutorial on this easy technique!


I've printed the image out on Ultimate Graphic 160gsm card from Polkadoodles, coloured her and cut her out to layer up over my background. For a full list of all the colours used pop over to the challenge blog.


I've done a quick to tutorial to create this background using my Graph;it Markers and glossy cardstock. I love colouring but don't have a lot of patience for colouring detailed backgrounds that take hours and hours but I do love this technique.  You'll need an assortment of Graph'It markers (or whatever alcohol markers you have), a blending mat (or you could use a glass cutting mat or a nonstick craft sheet) and some Mix'It Fluid. You're best to choose pretty dark shades of the colour you're using as the Mix'It Fluid will soften the colours.


Firstly scribble your markers on your blending mat in a random pattern


Spritz lightly with Mix'It Fluid


Swoosh your glossy card through the inky mess on your blending mat and repeat, mopping up the ink to fill in any white areas


Here's my A4 sheet


Next drip your Mix'it fluid onto the background using the inside of the spritzer bottle

Add some larger drops with a paintbrush handle


Leave it to dry to create a lovely sky effect


I've distressed the edges with black soot distress ink and then added some stencilling with black archival ink


To add some stars or snow just splatter your scene with ink from a White and Silver Graph'It Shake pens


and your background is finished, ready to add your image or perhaps stamp a sentiment. I've added a sentiment using one of my favourite stamps from Indigo Blu, stamped in versamar and embossed with WOW Mercury Grey EP, its my favourite at the minute as its a lovely warm sparkly silver! The sentiment isn't showing up too well in the pic but it reads: Courage, strength and determination, that's what little girls are made of.


I'm entering this project in the following challenges

Creative Knockouts: anything goes
Fab'n'Funky: Something new  (new image)
Live and Love Crafts: Something new (new image)
Simon Says Stamp: something new (new image)

Thanks so much for visiting today, hope to see you again soon
Claire xx


Monday, 7 December 2015

Winter Trees at Flonzcraft Vintage Stamping Challenges

Hello again, I'm back with my second post of the day as its time for our new challenge over at Flonzcraft Vintage Stamping Challenges where our theme this time is 'Winter Trees'. My teamies have loads of inspiration for you so pop on over to the challenge blog and check out their beautiful projects. Our lucky winner will receive a $20 voucher for Flonzcraft so don't miss out on your chance to win! Don't forget we're a stamping challenge so no digis are allowed.


I began with my frame for this project as I'd been die cutting and had these left over so I decided to use them to frame my winter scene. I used a Clarity stencil and distress inks applied with Clarity stencil brushes to create the background, using a mask die cut from a post it note to mask the moon. I've added two adorable little girls in their winter coats from Flonzcraft, they've been coloured with distress inks too. I added a die cut snowflake, holly vine and asilver bow topped with a red button a a scrap of silver twine.

I'm entering this card in the following challenges:
Crafting for all seasons: Brrrrr its cold outside
Crafty Calendar: Let it snow
Dies R us: Christmas
Paper Shelter: Christmas card
Simon Says Stamp: let it snow
Sparkles Forum Christmas: Die cuts for Christmas
That's Crafty: Seasons Greetings

Thanks so much for visiting today
Claire xx

Sunday, 8 November 2015

Winter in Paris at Fashionable Stamping Challenges

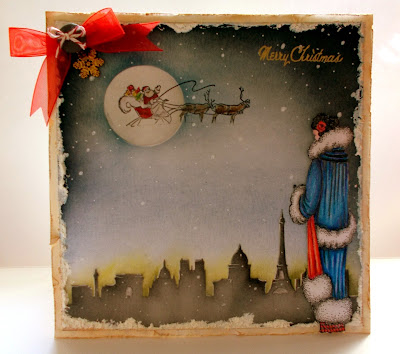
Hello there my lovelies, we've got a new challenge starting at Fashionable Stamping Challenges and this time around our theme is 'Winter in Paris'. Our lucky winner will receive a $20 voucher for Flonzcraft and of course the DT will be voting for the Top 3 too.


I've made a little scenic card for my DT project. I began by creating a background using a mask from Clarity and distress inks to create the sky and the skyline. I used Silver PanPastel to give the moon a bit of a shimmer and added some snow with a white Graph'It Shake pen. The sentiment and santa stamps are both from Flonzcraft, I've embossed the sentiment with Gold EP and added a little colour to Santa and the reindeer with Lyra pencils.

The lady is one of the fabulous flappers from Chocolate Baroque, I've coloured her with pencils, cut her out and added her with 3d foam pads. To finish off I've applied white texture paste and glitter around the edges of my scene and popped a little bow and a snowflake charm in the top corner.

I'm entering this project in the following challenges:
Allsorts: ribbons and bows
Crafty Catz: Winter
Ooh La La: embossing
Southern Girls: Twine tape or ribbon
Sweet Stamps: anything goes

Thanks so much for visiting today
Claire xx

Sunday, 11 January 2015

Something new at Fashionable Stamping Challenges

Hello my lovelies, its challenge time at Fashionable Stamping Challenges and this time around the theme is 'Something new' so its a good excuse to use your new stash or perhaps make a new home or new baby car. As always our lucky winner will receive a $20 voucher from Flonzcraft so I hope you're going to join in with us. Don't forget though, we're a stamping challenge so no digistamps are allowed!


For my card I've used one of my new Flonzcraft stamps, this one is called Pine Tree Sequoia and you can find it here. I began by creating a background using a Clarity Stamp and distress inks in shades of blue with a little black soot around the edges.

I stamped the image with versamark and clear embossing powder and inked with Chipped Sapphire and black soot distress ink before applying Ranger frosted film. I've had it ages but I don't think i've ever used it before but it gives a lovely effect in real life.


I added a Sizzix die cut bird and branch and stamped a sentiment from Chocolate Baroque to finish off.

I'm entering this card in the following challenges:
Alphabet Challenge: x for xperiment (using frosted film)
Crafts 4 Eternity: blue tones
Crafty Calendar: What's new
Die Cut Divas: anything goes
Scrapbooker phd: Masculine birthday plus die cut

If you've got time pop over and check out my DT sisters projects, as always they have created some gorgeous artwork!
Thanks for visiting today
Claire xx

Sunday, 23 November 2014

Trees at Craft a Scene

Good afternoon, I hope you're having a lovely crafty Sunday afternoon. This is my second post of the day, for our 'Trees' Challenge at Craft a Scene


I've created the scene on cream card using a copier paper mask that i'd die cut with a Spellbinders die to create an aperture. I used torn paper to mask the hills and used PanPastels in shades of blue to create the scene. I used small tree stamps and Deer stamps from Clarity Stamps, the sentiment is from Chocolate Baroque. I added the larger trees (again from Clarity) and glittered them for a bit of Christmas sparkle. I distressed the edges with a little black PanPastel and matted on some kraft card.

I'm entering this card in the following challenges:

Allsorts: no designer papers
Animal Friends: its cold
Artistic Stamper: Christmas is coming
Dies r Us: Christmas

Thanks for visiting, hope to see you again soon
Claire xx

Sunday, 31 August 2014

Include a 4 Legged Animal at Craft a Scene

Hi i'm back with my second post of the day, this is my DT card for Craft a Scene where if you're really quick you can still enter our 'Include a 4 Legged Animal' challenge.


I've used a gorgeous cottage stamp from Chocolate Baroque, surrounded by trees from Clarity. The deer in the foreground are stamps from Sheena Douglass. I've coloured with Distress Markers and added some WOW 'Sparkling snow' embossing powder to give an icy sparkle here and there.

I masked the moon and inked in the sky using distress inks in Faded Jeans, Stormy Skies and Chipped Sapphire. To finish off I've stamped the sentiment (from Chocolate Baroque) and embossed with WOW Gold EP and added some snow with a White Graph'It shake pen.

I'm entering this card in the following challenges

 Allsorts: Early Christmas makes
Fussy and Fancy: pets/animals
Jingle Belles: use gold
Penny's paper crafty: Christmas or children

Thanks so much for visiting today
Claire xx

Monday, 25 August 2014

Madeleine

Good morning my lovelies, yippeeeee its a Bank Holiday here in the UK so I've got an extra day off work to play! This card was made using the beautiful Madeleine stencil from Clarity and a shaving foam background. I haven't used that technique for ages but saw Barbara Gray using it and was inspired to have a play, you can't beat a bit of messy fun lol


I embossed the stencil through my Grand Calibur and then set to colouring with my Graph'It markers before cutting her out.


The background is from a batch of shaving foam backgrounds I made a few weeks ago and done a wee bit more inking and then added a little bow and some paper flowers.

I'm entering this card in the following challenges:
ArtbyMiran: anything goes
Clear it out: anything goes
Crafters Cafe: square cards
Little Miss Muffet: anything goes

thanks so much for popping by, hope to see you again soon
Claire xx

Friday, 25 July 2014

Airbrushing at Graph'It Colouring Challenge

Good morning folks, I don't seem to have done much blogging lately, its been soooooooo hot I've just come home from work and collapsed in a heap lol. Anyway today's project is for our new challenge at Graph'It Colouring Challenge where our theme is 'Airbrushing' but if you don't have an air brush don't worry cos neither do we lol, we've improvised - I've used the tube from an old biro to create my background. Its a really fun technique and my teamies have got loads of inspiration so I do hope you're going to play along although you don't have to use the technique to enter - the theme for challenge entrants is 'Hot colours'. There's a fab prize of Graph'It goodies for our lucky winner and you've got to be in it to win it!!


I created a stencilled background by embossing the stencil with my cuttlebug and then adding PanPastels in shades of yellow. Next I added some depth and shading with my Graph'It markers. I replaced the stencil and then added some shading using my trusty Graph'Its and my old biro tube as an airbrush. I found it works on the chisel or brush nib rather than the bullet nib and you have to play around as you get different effects depending on how hard you puff lol! I had sooooo  much fun, small things please small minds and all that . When you've finished you can clean your stencil with a little spray of Graph'It Mix'It fluid too.


I made a little frame for the image with more PanPastels and Maimeri Light Modelling Pastel through a Dutch Doobadoo chicken wire stencil 

I've added a sentiment created using a Chocolate Baroque stamp and used a Prima Doll stamp too, she's been coloured with Graph'Its and layered up on 3d foam pads


I'm entering this in the following challenges:
Crafters Cafe: anything goes
Crafty Sentiments: hand coloured image
Creative moments: anything goes/one flower
Inky Impressions: No designer paper
Ladybug Crafts: summer flowers
Little Miss Muffet: anything goes
Paper Shelter: anything goes
Penny's Paper Crafty: anything goes

Well as usual i'm rushing off to work, hopefully I'll be able to get home in good time and enjoy the sunshine when I get in .
Thanks so much for visiting today, have a lovely day 
Claire xx

Tuesday, 15 April 2014

Journey to Paris

Good morning folks and big warm welcome to my new followers, it's always lovely to 'meet' new friends! Today's card was made for the challenge at A Vintage Journey where the theme is 'A little bit French'. This project was actually inspired by the alley way next to my work, not as glamorous as Paris, in fact its a very scruffy and rundown little street in the town centre but among all the weeds, muddy parking bays and old wooden doors with peeling paint there are pretty forget-me-nots, little wild birds looking for nesting materials and bees and butterflies. You really can find beauty everywhere.


I'd made this background a few weeks ago using a mask from Clarity, Stampers Anonymous stamps, Crafters Workshop harlequin and squares masks and distress inks (tumbled glass, broken china, old paper, vintage photo and walnut stain). Once all the ink was dry I applied Maimeri Glassy gel over the squares through the stencil and then sprinkled with micro beads, I love this effect its so pretty when the beads catch the light.


The images are two of my favourite stamps from Crafty Individuals, coloured with Graph'It markers and distressed with Old Paper and Vintage photo distress inks, I added some pretty blue lace and bead trim to the bottom of the images.


I've added some crinoline flowers, an Ideology facet layered over a sentiment from the Gecko Galz. I've stamped some butterflies, fussy cut them and layered them over the card and to finish off I've added a seam binding bow and a gorgeous mother of pearl button topped with a twine bow.

I'm also entering this card in the following challenges:

Crafty Individuals: Nature's Beauty 
Docerela Creations: anything goes
Fussy and Fancy: all about travel
Penny Black and More: blossoms and blooms

Well I'd better scoot off to work now so thanks for popping by today, 
Claire xx

Sunday, 6 April 2014

Your favourite technique at Fashionable Stamping Challenges

Hello my lovelies, its a busy weekend of blogging for me and this post is for our new challenge at Fashionable Stamping Challenges where the lovely Dot has chosen our theme which is 'Your Favourite Technique'. As always we have a fab prize for a $20 voucher up for grabs from our generous sponsor Flonzcraft! We especially need to see that the stamping is the focal point on the project and that this must follow the format of the theme too.


Well I've combined 3 of my favourite techniques for this project, playing with stencils and mediums, colouring and altering stuff from the mountain of 'goodies' waiting to be decorated lol.

This little gift box started life as a box of maltesters (yum). I began with a coat of Maimeri Gesso and then some cream emulsion paint. Once that was dry I distressed the edges with shabby shutters distressed ink and added a touch of treasure gold too. I took a sheet of a4 ivory card and got to work with an Imaginations Crafts stencil and Maimeri Light Modelling Paste coloured with shabby shutters distress reinker.


Once that was dry I cut it up to cover the box, distressing the edges with more distress ink and my craft kniife. I stamped a corner stamp from Clarity in the corners of the box using gold stazon.


The image is one of my favourites from Flonzcraft, she's called 'Girl on a Windy Hill' and she's been coloured with Graph'It Markers and die cut with a sizzix oval die and edges with pearl trim. I've used a spellbinders die cut and seam binding ribbon to make a closure for the box and added some glittered paper flowers and a tiny die cut butterfly.

I'm entering this in the following challenges:
A Creative Romance: Spring flowers
Crafty Little Fairies: vintage/shabby chic
Fairies Challenge: shabby/vintage
Get Inky: spring/Easter
Imagination Crafts: anything goes
So Artful: signs of spring
Stamplorations: Stamps and your favourite technique

If you've got a few minutes do check out all the gorgeous inspiration from my lovely teamies,
have a great Sunday and thanks for visiting today
Claire xx

Monday, 9 December 2013

Snowy scene

Good morning folks, I think I blinked and missed the weekend as its Monday already. I'm not too grumpy though as its our staff party today so we get to down tools at lunchtime and relax with a nice buffet and some Christmas music. Anyway before the festivities, I just wanted to share a card made for a couple of challenges:


I love to make a card from just white card, its sooooooo satisfying isn't it? this card is made just from one sheet of white card and a chipped sapphire distress ink pad (and of course loads of Clarity Stamps). I saw this months challenge at Clarity was scene building and had decided to try and play along and when I spotted the challenge at Craft a Scene was to make a winter scene with an optional extra of making a tri-shutter card I had to have a go.

The folding lark was the most complicated, eeeeeeeek! I'm totally useless at measuring and folding lol. I began by creating the card base and then set to with my Clarity Stamps to create the wintery scene. the scene didn't look right extending in to the bottom of the card so I used a shaving brush and more Chipped Sapphire ink to create the blue border and added some snow with a white sharpie pen.

Here are a couple more pics:


I wasn't too sure about the tree at the top but they kind of look like dark hills in the background (hopefully lol)


I'm also entering this card in the following challenges:
Clarity Stamps: Scene building
Craft a Scene: winter scene plus optional trishutter card
Crafty Calendar: December Cold and Frosty
Fab'n'Funky: frosty
Jo's Scrap Shack: winter wonderland
Inky Impressions: winter/snow
Simon Says Stamp: make your own background
Stamplorations: christmas stamps and silhouettes

Have a good day and thanks so much for visiting today
Claire xx

Thursday, 31 October 2013

Guest Designer at Frilly and Funkie!!

Good morning folks, woooo hooo what an exciting day!! I was chuffed to bits to be the DT's choice for a guest designer spot over at the Frilly and Funkie Challenge, of course I jumped at the chance to play along with such a talented bunch of ladies. Anyway the challenge is to create a card or project that reflects the abundance of the harvest season and the gratitude we express at Thanksgiving. Hmmmm, I had to get my thinking cap on for this one and I decided to take inspiration from the harvest theme and the beauty of nature and here is my project .....


A couple of weeks ago I was busy decluttering ( I don't know about you but I'm always decluttering and the house is still full of clutter lol) and I came across a funny little handbag that was a free gift with some make up. It had been gathering dust for years and was looking very sad, I decided that I'd keep the clasp and as I was prying it off the bag I thought I'd keep the bag and add it to my huge pile of stuff waiting to be altered. Here's the before pic


I began by giving the outside a coat of gesso and then smothering it with a layer of Flitter Glu and Kroma Crackle before blasting it with my heat gun. I'm so loving this effect at the minute, I'm crackling everything in sight lol. Once it was dry I added some colour with my PanPastels and gave it a coat of Maimeri Glossy Gel Medium, it looks a bit like a dragons egg doesn't it?


For the inside I stamped two little scenes, the top one with stamps from Joanna Sheen and the bottom one using a Clarity Stamp, I coloured them with Graph'It markers and created a cloudy sky with some PanPastels. I layered the little scenes up over loads of tissue paper. Next It was time to add lots of leaves and other goodies. I die cut lots of leaves from kraft Glassine, coloured with Memento Inks in various shades of yellow, red, purple, green and orange. I crumpled all the leaves up for some texture. I added the leaves around the edges of the little scenes, adding some little berries, lots of raffia and some die cut flowers made from Crinoline Fabric. 


To finish off I added some gingham bows and some little rusty bells. 

I'm entering this project in the following challenges:
Cuttin and Stampin: Autumn harvest
Heck of a Challenge: Autumn colours
Sweet Stampin: Woods, trees, leaves

Thanks to the lovely ladies at Frilly and Funkie for inviting me to join you for this challenge, its such an honour :-) and thanks to you for popping by today, hope to see you again soon
Claire xx


Wednesday, 5 December 2012

The Funkie Junkie's Tag Challenge: Number 7

Hi there, I've been playing catch up with the Christmas tag  challenge over at The Funkie Junkie, here is my pennant inspired by Linda's 7th tag (pop over and have a look here, its a stunner, If you want to find out all about the challenge you can find the details here. The challenge is sponsored by The Funkie Junkie Boutique so its definitely not to be missed!)


If you pop by regularly you'll know that i'm making some festive bunting inspired by Linda's gorgeous tags, now I've made quite a few I'm getting excited about seeing them finished. For my project I've used kraft resist paper, brass snowflake charms from The Funkie Junkie Boutique. The little winter scene is a Clarity stamp, with torn edged distressed with walnut stain distress ink and matted on some corrugated card embossed with clear UTEE and gold EP. I've coloured my reindeer die cut with panpastels and triple embossed with more UTEE. To finish off I've added some gingham ribbon, a button and some twine.


I'm entering this project in the following challenges:
Crimbo Crackers: anything holiday goes
JingleBelles: anything holiday goes
My Sheri Crafts: tis the season
Oozak: anything goes plus red
Sweet Stampin: snowflakes and ribbon
The Ribbon Girls: Christmas projects
Totally Stampalicious: anything but a card

Brrrrrrr its freezing here at the minute, we've had some really frosty morning which makes it fun when the dogs take me for a walk in the morning lol. Hope you are keeping warm and cosy where ever you are and  thanks for popping by today, 
Claire xx


Sunday, 25 November 2012

Frosty and Bright at PanPastel UK

Good morning all, Sunday morning so we've got another challenge at PanPastel UK for you. This week our theme is 'Frosty and Bright' and I've combined PanPastels with the fabby new Maimeri mediums available from Your Creativity Store. Apologies in advance for the decidedly dodgy photos, we don't seem to have seen daylight for weeks lol.

I've layered up assorted die cuts on my canvas, using Maimeri Matt gel to adhere them and then giving the whole thing s coat of Maimeri gesso. Once dry, i've used while, ultramarine blue and tint and some Raw Umber for a little shaddow. To add more texture I've used a couple of Crafters Workshop templates, the snowflake frame with Maimeri modelling paste and the mini mosaic with Maimeri iridescent medium (love love love this stuff!!!) Next came lots of rock candy glitter, faus pearls and some red acrylic paint applied in dots with the end of a paint brush. 

I stamped the focal image, Stampendous 'Snow Bird' on to the canvas with sepia versafine and also on some water colour paper. I coloured the image with distress markers and then cut out the bird and berries and popped them on to the canvas. I added white glue and glamour dust for some frosty sparkle


The sentiment is a clarity stamp, stamped on tissue paper and applied with more Maimeri Matt Gel


I'm entering this project in the following challenges:
Crafty Creations: christmas is coming
Delicious Doodles: Something that flies
Fussy and Fancy: feeling blue 
Little Claire's : Christmas
Tanda Stamps: Christmas

As always our lucky winner will receive a fabby prize of a PanPastel Starter courtesy of the lovely Berni from Your Creativity Store

I hope you're enjoying your weekend, I've got a few days off work lined up and loads of jobs that I should be doing. I say should as its very tempting to spend the day in my craft room lol.
thanks for popping by
Claire xx


Sunday, 12 August 2012

Create a Scene at PanPastel UK

Hi there, here's my DT card for PanPastel UK where our theme is 'Create a Scene', I love to create a scene (lol) and Pans make it so easy, much easy than brayering anyday


I've created the scene using shades of green and blue PanPastel, using a sofft knife and cover its really easy to create the hills and add depth to the scene. To create a little reflection in the water I just smudged the green panpastel in to the blue. The ballon stamps are from Kaisercraft (in the fabby candy I was lucky enough to receive from Paula) and the scarecrow and trees are Clarity stamps, I've added some colour to the images with distress markers and matted on some blue pearl card with some red gingham ribbon to finish off. 

I'm entering this card in the following challenges:
2 Sisters: on the farm
4 Crafty Chicks: up up and away
Anything goes: Summer days
Craft a Scene: the great outdoors
Creative Stamp Friends: Stamp a scene

This week we have a new sponsor, Mountain Ash Crafts and our lucky winner will receive a fab prize of £10 worth of Sofft tools!!

Thanks for popping by today, enjoy your Sunday. We're enjoying some beautiful weather so I'm going to spend the day in the garden with the dogs and my panpastels, ahhhhh bliss!
Claire xx


Thursday, 26 January 2012

Burn's Night Challenge at Rainbow Lady's Challenge Blog

Hi there folks, Thursday again so time for a new challenge from the lovely Cynthia over at Rainbow Lady's Challenge and this week our theme is 'Burns Night' so we want to see anything to do with Scotland.


For my DT card i've created a brayered scene using my favourite 'Mountain Meadow' Big&Juicy inkpad and stamps from Clarity. I've matted the scene on white card,then black card. The gorgeous tartan backing paper is from Crafty Ann's , the colours are a perfect match for the inkpad and fitted the theme beautifully. 

I'm entering this card in the following challenges:
Craft a Scene: anything goes (with a scene)
Crafty Boots: Inspired by a song title (By the light of the silvery moon)
Let's Ink It Up: anything goes
Stamp & create: anything goes
Victorine Orignals: anything goes

Thanks for popping by today
Claire xx

Related Posts Plugin for WordPress, Blogger...