Pages

Sunday, 30 December 2012

Surprise us at FSC!

Hello folks, I hope you're all enjoying the Christmas and New Year break. I've got 9 days off work now so hopefully lots of time for crafting :-)
Back to business as we've got a fab new challenge over at Fashionable Stamping Challenges where our theme is 'Surprise Us'. Our lovely teamie Joanna suggested that we should all make a project to send to one of our DT sisters so next week I'll be posting my project out to ...... nope not telling, that would spoil the surprise lol.


I've altered a little board book box using acrylic paint to create a crackle background, and adding lots of gold embossing. I then made a panel using alcohol inks (wild plum, cranberrry and snow cap) which I stamped with a gorgeous Chocolate Baroque flower stamp and embossed with Gilded Ivory EP. ?Unfortunately my photography skills don't get any better so the photos are pretty rubbish. I added some lace, ribbon and little flowers (from The Funkie Junkie boutique) I made a little brooch to go in the box, using crinoline fabric coloured with the same alcohol inks and white netting, I added a button and stiched some crystals and seed beads around the button centre. Here's another pic which is perhaps slighly better, or maybe not lol. 


I'm entering this project in the following challenges:
C.R.A.F.T: Not a card
Fab'n'Funky: ribbon/lace
Live and Love Crafts: anything but a card
Simon Says Stamp: anything goes
Try it on Tuesday: Lucky Dip (Stamped image and ribbon)

As always our challenge is sponsored by the lovely Marina from Cottage Crafts with a voucher for the lucky winner so don't miss out!  Don't forget though, we're a rubber stamping challenge so no digi stamps allowed :-)

Thanks for popping by today, have a lovely Sunday. If you have time grab a coffee and pop over to visit my DT sisters as they have really come up with some gorgeous creations this time
Claire xx

Friday, 28 December 2012

Steampunk Butterfly from Chocolate Baroque

Good morning folks, I hope you're enjoying a lovely Christmas break, I'm at work today booooooo hoooooo! But I'm not too downhearted as after today I've not a week off which I'm planning on spending in my craftroom lol. Anyway as a change from Christmas projects my card share today is another sample featuring the gorgeous Steampunk Butterfly stamps from Chocolate Baroque.

The background was created with the cogs stamp from the set over a background made with Seedless preserves and broken china distress inks. I stamped and embossed the keys with gold EP and added some gold ribbon and a butterfly charm. The focal image was made using the same inks on glossy card stock, again stamping and embossing with gold EP. To finish off I've added some wire antanna and edges the card with a gold krylon pen.

I'm entering this card in the following challenges:
Creative Moments: embossing
Divas by Design: anything goes
Flutter by  Wednesdays: Open challenge with butterfly or fairy
Hiding in my craft room: anything but Christmas
Simon Says Stamp: anything goes

well as usual at this time of morning, i'm rushing around getting ready for work so I'd better get myself organised for the day ahead. Before I go though, do pop over to the Chocolate Baroque DT blog as there are some gorgeous new stamps released today!!
Thanks for popping by today, 
Claire xx

Wednesday, 26 December 2012

Decorate to Celebrate GDT

Hi there, I hope you are having a nice relaxing Boxing Day. I'm having a very lazy day but before I go and do some serious lazing, I wanted to share this project with you. I was chuffed to bits to be invited to be a Guest Designer for Decorate to Celebrate, what an honour! A big thank you to Amy and her lovely team for inviting me to join them. The challenge the theme is 'New Year/Winter Party', how exciting!! Do pop over to the Challenge blog to find out all about this fab challenge.


Now what could be more exciting than a Winter Party, my thoughts turned immediately to icy decorations, beautiful party frocks, some Christma decorations and children ready for bed but too excited to sleep. I set too altering a little house shaped thimble display unit to create a Party Scene. I won't go in to lots of detail as it took ages and I had loads of fun making it. Here are a couple more pics: 


Can you see the little mouse flat on his back behind the lady? He's polished off a bottle of wine and is feeling a bit worse for weat lol, the bottle and glasses are hidden in the shadow. 
In the pic below you can see the little children and the mouse watching from outside by the streetlamp.


Here's a list of some of the supplies I used:
Stamps from Crafty Individuals, Chocolate Baroque and Joanna Sheen
Acrylic Paint, distress inks, promarkers, glimmer chips, pale blue gingham ribbon, a broken pearl necklace, Marianne die cut icicle border, sparkly beads, stickers , tiny gold baubles and little gold bells, and lastly lots of faux snow made using rock candy glitter, clear holographic glitter, shaved ice, tiny clear stars and a little silver glitter - sprinkled all over (the dogs and I were sparkly for days when I finished lol)

I'm entering this in the following challenges:
Addicted to stamps: blue Christmas/winter
Bunny Zoe's Crafts: Celebration
Crafty Calendar: white Christmas plus metal (I've added some little bells)
Crafty Mess: vintage Christmas
Die Cutting Divas: More holiday spirit
Joanna Sheen Challenge: with love at Christmas
Ribbon Carousel: Holiday spirit

 I hope you're enjoying the Christmas break. I'm back at work tomorrow (booooo hooooo) but I finish on Friday and have a week off work - I can't wait :-)
Thanks for popping by today
Claire xx


Tuesday, 25 December 2012

Merry Christmas

Merry Christmas to all my lovely friends and followers. The turkey is in the oven, pressies are opened and the dogs have worn themselves out playing with their new toys so I thought I'd pop in and wish you all a very happy and peaceful Christmas

Here are a couple of pics of our fur baby's enjoying themselves this morning (even worse photos than usual as  I took them on my phone lol)


Have a wonderful day 
Claire xx

Sunday, 23 December 2012

Tree Silhouette from Chocolate Baroque

Good morning folks, this week seems to have gone by in a blur but despite being busy at work, my washer breaking down and the fact that it doesn't seem to have stopped raining for weeks I'm just about ready for Christmas. In  fact I managed to grab an hour in my craft room to make this card, featuring the 'Stamp of the Week' from Chocolate Baroque which is Tree Silhouette.


I love this stamp, its such a beautiful image and lends itself to all sorts of scenic cards. I thought I'd make one last Christmas card before I pack the Christmas stash away.

I began by stamping the main image on a square of white card with versamark and embossing with black embossing powder. Next I used a black sakura glaze pen to extend the scene beyond the stamped image. I masked the moon and used various shades of blue distress inks to create the sky, splashing with water and blotting to create a bit of a snowstorm effect.

The sentiment is also from Chocolate Baroque as is the snowflake stamp used for the background.

I'm entering this card in the following challenges:
Aud Sentiments: anything with a sentiment
Card Mania: Snowflakes
Craft a Scene: winter scene
Crafts and Me: Winter wonderland: 
Loves Rubber Stamps: Merry Christmas
Raise the Bar: Let it snow

I hope you're getting organised for the big day. I'm waiting for the nice man from Tesco to deliver my food shopping and then I'm just about ready so once that little lot is put away the day is my own. 
Thanks for popping by, have a lovely Sunday
Claire xx

Wednesday, 19 December 2012

Flying 'Thingamajig'


Good morning, I don't know abut you but I'm about all 'Christmassed out' after weeks of making Christmas cards. Anyway the Stamp of the Month over at Chocolate Baroque is a gorgeous A5 stamp set called Steampunk Butterfly. perfect if you fancy a change from festive projects. There are some fab stamps in this set and  I particularly  loved these 'batty' wings, and thought they would make a great little canvas.


I created the backgorund using acrylic paints and glimmer mists. The clouds were made by applying white acrylic paint with a sponge and then once that was dry sponging pearl acrylic paint along the underside of the clouds. You can see them a bit better in this photo:


I stamped the wings on to silver paper with black archival ink, cut them out and applied them to the canvas with matt multi medium. The 'thingamajigss' are from a box of all sorts of bits and pieces I found in the shed and I'd been saving them for a steampunk project. Apparently it is a radio valve (thanks Elaine) . I added some more wings and then 'Let the Adventure Begin' from Artistic Affirmations which I stamped on tissue paper, embossed in silver and applied with multi medium. I then gave the words a coat of rock candy crackle paint:


I edged the canvas with a sparkly mixture of UTEE, silver embossing powder, microbeads and tiny stars which I adhered with more matte multi medium and heat embossed.
I'm entering this one in the following challenges:
Crafts 4 Eternity: blingtastic
Crafty Sentiments: all that glitters
Creative Moments: anything but a card

thanks for popping by
Claire xx

Sunday, 16 December 2012

Ta da!!

Phew I finally finished my festive Christmas bunting inspired by Linda's fabulous 12 tags of Christmas Challenge. You can find all the details of the challenge here and see Linda's beautiful 12th tag here. The challenge is sponsored by The Funkie Junkie boutique and there are some amazing prizes!  Although my camera is still poorly sick and drying out in a bowl of rice I did manage to get the pics from the memory card so I could show you the finished result. The bunting was so long I had to split it and I've put one on the dresser in our hall :


and the second in the dining room. 


And here's a pic of the final pennant:


I made this with a background stamp from Christmas Flourish by Chocolate Baroque, a bauble stamp (also from Chocolate Baroque) and lots of distress inks. I added some gold mesh ribbon from my stash, a stamped sentiment, a couple of die cut holly leaves and a poinsettia made from Crinoline fabric. The sprig of holly at the top of the pennant was actually a bit left over from putting up the Christmas decorations, you know how it is with all the bits on the floor? Well it seemed a shame to throw it away so I popped it on my pennant.

I'm also entering this project in the following challenges:
ABC Challenge : D is for Deck the halls
Brown Sugar: red green and cream
Come and get it: anything Christmas
Fussy and Fancy: tags and banners

The eagle eyed amongst you may notice that there are actually 11 pennants instead of 12, thats because our puppy Barney managed to get his paws on one and chew it up! He's full of mischief and I have to keep a beady eye on him while I'm crafting as he's always looking for something to chew.

Right before I go and watch Strictly, thanks for popping by and a huge thank you to Linda at The Funkie Junkie for such an inspirational challenge, I've really enjoyed every inky minute of it.
Claire xx


Christmas at PanPastel UK

Good morning, eeeek  I'm running a little late this morning as we've got gremlins in the house. Barney has managed to spill his water bowl all over the floor so the kitchen was awash lol. Just got that mopped up and I managed to drop my camera in my coffee - not a good idea. Anyway its time for a new challenge over at PanPastel UK, where we've got a Christmas theme this week. As always our lucky winner will receive a fab PanPastel Starter kit from our generous sponsor Berni at Your Creativity Store.  


For my DT project I've created a little scene using Stampendous stamps and PanPastels and altered a photo frame using Maimeri Light Modelling Paste and more PanPastels (of course lol)

I applied the Maimeri modelling paste and used the triangular comb to create a wood grain texture and left it to dry. Once dry I applied Raw Umber and Burnt Sienna PanPastels and then a coat of MaiMeri Gloss Medium to seal the 'woodgrain' effect.

The main image is a Whiff of Joy stamp, coloured with distress markers. I added a frame of holly leaves made bycolouring white card with various shades of green PanPastel and then stamping lots of holly sprigs (stamp from Molly Bloom) and cutting them out. I finished off by adding red gems for holly berries, some seam binding ribbon and a gorgeous brass snowflake charm.

I'm entering this project in the following challenges:
Creative Moments: anything but a card
Delicious Doodles: anything but a card
Fab'n'Funky: Vintage Christmas
Incy Wincy: christmas with snowflakes
Ribbon Carousel: Holiday spirit
The Stamp Man: In the bleak midwinter

Thanks for visiting and for your lovely comments, I'm off to see if I can dry my camera off now
Claire xx

Mask it at Fashionable Stamping Challenges

Hello folks and Happy Sunday to you :-) My card today is for our new challenge at Fashionable Stamping Challenges and it was my turn to choose the theme this time around and I've chosen 'Mask it' as our theme so you can use masking techniques or a mask stamp,  etc. Don't forget we're a rubber stamping challenge so no digi stamp allowed. As usual our lucky winner will receive a fabby gift voucher from our regular sponsor Marina from Cottage Crafts !


For my card I've used masking to create my background, I've wanted to have a try and masking pyramids for ages so this challenge was the ideal opportunity to put it into practice. I thought it would be tricky but PanPastels are so forgiving is was easy peasy :-)

I created 3 maske - firstly one of the fronts of the pyramids, then one of the sides of the pyramids and lastly one of the full pyramids. I used shades of yellow, brown and a little black PanPastels for the pyramids. I began by applying the pastels through the mask of the front of the pyramids and then through the side view mask - adding a little black to create shadows. The I masked the finished pyramids and added the sky using Phthalo blue extra dark panpastel with a little Paynes Grey and Black around the edges. 

I stamped the 3 kings stamp from Stampers Anonymous with black archival ink. The star and sentiment are from Chocolate Baroque, stamped with versamark and embossed with gold EP. To finish off I've added a gem to the centre of the star and matted the image on layers of gold, black and white card.

I'm entering this card in the following challenges:
Aud Sentiments: Anything goes with a seasonal sentiment
Charisma Cardz: Christmas makes
Deep Ocean: Christmas
Here come the boys: anything goes
Paper play: You're a star
There she goes: Season of giving

Thanks for popping by
Claire xx

Saturday, 15 December 2012

DT Call at No Matter Which Challenges


Helllooooo, hope you are having a lovely Saturday! I'm in a bit of a Christmas panic so I've been chasing round shopping, catching up with jobs etc. Its all good fun isn't it? Anyway this is just a quick post to give you a heads up about the DT Call over at No Matter Which Challenges

Photobucket

Its such a friendly team to be a part of so I do hope you'll pop over and find out how you could be in with a chance of joining us. I've finally finished my festive bunting so I'm off to try and put it up, eeeeek I don't like heights at all!! If all goes well I'll be back with a pic
thanks for popping by
Claire xx

Friday, 14 December 2012

Linda's Tag Challenge, number 11

Good morning, well here's my 11th pennant for my festive Christmas bunting inspired by the fabulous 'Funkie Junkie's 12 tags of Christmas challenge. I really can't wait to put my bunting up now just in time for the big day, I'll be posting my last project tomorrow with pictures of the bunting 'in situ'  lol.  If you want to find out all about the challenge pop over and have a look at Linda's blog here, you can check out her gorgeous 11th tag here too. The challenge is sponsored by the Funkie Junkie Boutique so there are some fab prizes up for grabs. 


I've created the background using a music stamp from Stampers anonymous, stamped with black archival ink, a large holly flourish from Chocolate Baroque stamped with versamark and embossed with clear EP and then lots of vintage photo distress ink. The leaves are die cut, treated with the same technique and then dipped in UTEE as are the berries. The poinsettia is a spellbinders die cut inked with a little vintage photo distress ink. I've added some lace from the Funkie Junkie Boutique, a seam binding bow and a little sentiment - it doesn't show up too well on the pic but its stamped on shink plastic and then popped into hot UTEE (I just love this technique)

I'm entering this one in the following challenges:
ABC Christmas: Favourite punch or die
Die Cuttin Divas: Holiday Spirit
Fab'n'Funky: Vintage Christmas
Sisterhood of Crafters: Christmas with a stamped background

Phew, as always I'm doing a happy dance cos its Friday (well I would be if I had an ounce of energy lol). One more week at work and then I finish for Christmas yippppppeeeeee. On the downside that means only one more week to finish the shopping, wrap the pressies, write the cards, I'd better stop now before I go into all out Christmas panic. I'm sure everything will get done, it always does and now i'd better go and brave the weather and get myself to work
Thanks for visiting today, hope you have a good day
Claire xx

Thursday, 13 December 2012

Linda's Tag Challenge number 10

Hi there, this week is flying by isn't it? I'm starting to get all excited about Christmas, I can't wait to see Barney our lovely puppy with his presents lol. Anyway before I start rambling on, here's my 10th pennant for my festive bunting, inspired by the fabulous Funkie Junkie's 12 Tags of Christmas challenge. Do pop over to Linda's blog, you can see her 10th tag here and find out all the challenge deets here. The challenge is sponsored by the Funkie Junkie Boutique and there are some amazing prizes so its definitely not to be missed! 


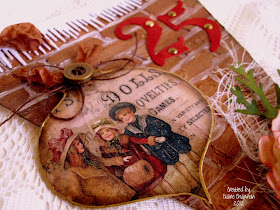
I think this is my favourite tag so far although the photo isn't too good so you'll have to use your imagination a bit lol. I created the brick background using a Crafters Workshop mask and Maimeri Light modelling paste, once that was dry I added some colour with distress inks (Tea Dye and Vintage photo) and finised off with a coat of Maimeri Gloss Medium. The icicle border at the top is cream card, die cut with a Marianne die and liberally dusted with glamour dust. The die cut numbers are coloured with Fired Brick distress ink, attached with gold brads.

The bauble is made using a gorgeous freebie vintage image from Linda's blog (thank you Linda!!), I don't have a bauble die so I stamped a Chocolate Baroque bauble on some card, cut it out and then applied the image using Maimeri gloss medium. I gave the finished bauble a couple of coats of gloss medium and edged it with a gold krylon pen. The flower and foliage were made with Tattered pine cones die, laterd up over a scrap of cheesecloth. The other bits and bobs are from my stash.


I'm entering this one in the following challenges:
Crafty Bloggers: Anything goes
One Stop Craft: Christmas friends
Ribbon girls: Christmas projects
Sugar Creek Hollow: Stencils or masks
Unstampabelles: Christmas no stamps


Well I've been full steam ahead trying to get all my pennants finished and hopefully I'm winning now, I think this one is my favourite so far, I love the vintage image and the brick effect too. Linda's tags have been such an inspiration, I'm thoroughly enjoying playing along

Thanks for popping by today
Claire xx

Wednesday, 12 December 2012

The Funkie Junkie's tag challenge number 9

I had a lovely few hours in my craft room at the weekend catching up with the Funkie Junkie's 12 tags of Christmas challenge. You can find out all about the challenge at Linda's blog here and you can see Linda's 9th tag here. If you want to play along you'll have to get your skates on as the tags all have to be complete by 17th December!! The challenge is sponsored by 'The Funkie Junkie Boutique', one of my very favourite shops so its well  worth playing along as there are some fab prizes.


Here's my take on Linda's 9th tag, if you've been following my entries you'll know I'm making some festive bunting and I'm so excited about finishing it off and actually seeing all the pennants together!! 
For this one, I used Maimeri Light Modelling Paste and the triangular comb tool to create a wood grain effect on the pennant, once it was dry I painted with brown emulsion paint and then crackled it with PVA glue and cream emulsion paint. The ribbon is from Crafty Ribbons and the lovely swirly flourish at the top is from CaroLines rubber stamps. I've stamped a kraft tag with a Chocolate Baroque sentiment and embossed with gold EP. I don't have any star dies so I used Molly Blooms star stamps to create my stars using grungeboard and gold EP for the little stars at the top of the tag. I used corrugated card from the Funkie Junkie distressed with fired brick distress ink. . The burlap is also from The Funkie Junkie. The buttons, holly leaves and other bits and bobs are from my stash. Here's another pic to show the detail:


I'm entering this one in the following challenges:
Charisma Cardz: Christmas
Crazy Amigo Challenge: Hanging objects
Jellypark: stars are shining
Milk Coffee: Christmas Decorations
Paper Play: Christmas is coming


Well its certainly starting to look like Christmas, its sooooo cold and frosty here it almost looks like we've got snow. I hope you're getting on well with all your Christmas preparations, its such a busy time of year isn't it?
Thanks for visiting today
Claire xx

Tuesday, 11 December 2012

Harlequin Christmas from Chocolate Baroque

Good morning, Harlequin Christmas is the 'Stamp of the week' over at Chocolate Baroque this week so if you're quick you can grab it for a bargain price. This is one of my favourite Christmas themeplates from Chocolate Baroque and I usually use it with rich vibrant colours but I thought it would be great for a man's card using earthy muted colours


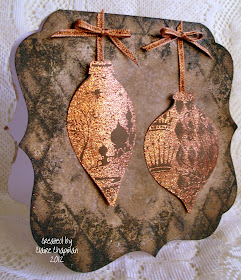
I started with a shaped card blank and coloured the front of the card with vintage photo and walnut stain distress inks. I then inked up the large harlequin background with versamark and stamped it around the edges of the card and embossed with walnut stain distress EP. 

I stamped the two baubles on brown card with more versamark and embossed with copper sparkle embossing powder. I cut them out and attached then with 3d foam, adding a little copper ribbon from my stash to finish off.

I'm entering this card in the following challenges:
Broken Box Stock: happy holidays
C.R.A.F.T: Christmas
Crafty Catz: shaped card
Crafty Mess: vintage Christmas
Totally Papercrafts: one for the boys

Thanks for visiting today
Claire xx

Monday, 10 December 2012

Steampunk Rose from Chocolate Baroque

Hi there, Monday morning already and for those who are a bit 'Christmassed out' here's a card made using the gorgeous riveted roses from 'Steampunk Butterfly' from Chocolate Baroque, combined with a few different background techniques


Silver is such a difficult colour to photograph so apologies for the quality of the pictures. 
The roses have been stamped and embossed with black detail embossing powder and painted with twinkling H2o paints and cut out. I've used silicone glue to layer them up over the nestie shape which features one of my favourite techniques (at the minute lol). its the 'riveted patchwork' technique - a really fun and easy technique. Just take snippets of Inkssentials foil tape, peel the backing off and stick them on some cardstock to create a patchwork effect. Then use whatever 'tools' you have handy to create a riveted effect along the edges - I don't have any of the little tools for working with metal so I used a pokey tool and a ballpoint pen. Once you've done this you can add colour with alcohol inks if you want but I just die cut the shape and then brushed over with some black acrylic paint and wiped it with a baby wipe to give a slightly aged look. You can see the effect a little better in this photo.


The next layer is made using kraft glassine, which I marbled using distress stains (I used ~Brushed Pewter, Picket Fence and a little Black Soot) I then crumpled the sheet of glassine and dried it with my heat gun to seal the colour.  Next I swiped the sheet with my Black Soot distress inkpad to catch the texture and heat set it again.

The last background layer was created using the cogs fragment stamp from Steampunk Butterfly, stamped with versamark and embossed with silver embossing powder and then coloured with Brushed Pewter distress stain and a little black soot.

I've used black card for matting and layering and added some black late and silver ribbon. The gorgeous swirls are from the Die-namics Fancy Flourish die and I've made some rolled ribbon roses using red and silver ribbon.

I'm entering this card in the following challenges:
Card Makin Mamas: silver and/or gold
Just us Girls: embossing
Stamping Shack: sparkle and shine
Sweet STampin: dies and punches

Thanks for popping by today
Claire xx


Sunday, 9 December 2012

A song or a carol at PanPastel UK

Good morning, Christmas is sneaking up on us so quickly isn't it? How are your preparations going? I had a bit of a panic last week as I hadn't done anything so I've whizzed round and put up all the Christmas decorations and done most of my Christmas shopping online. Anyway talking of Christmas, here's a card for our new challenge at PanPastel UK where our theme is 'Inspired by a song or carol'. As always our lucky winner will receive a fab PanPastel starter set from our generous sponsor Berni from Your Creativity Store. I've taken inspiration from 'Frosty the Snowman' for this card.


The focal image is one of the Thomas Kinkade stamps from Joanna Sheen, coloured with PanPastels and Distress markers, with lots of glamour dust for frosty sparkle. 
The background was made using white and paynes grey Panpastels applied randomly to white card and then overstamped with a Chocolate Baroque snowflake stamp using flitterglu before sprinkling over lots of Stampendous Silver Halo glitter, this has got to be the glitteriest glitter Ive ever seen. Gorgeous stuff, I haven't captured the sprarkle very well in the pics but you can see it a little better in this one


I'm entering this card in the following challenges:
Craft us Crazy: Christmas/Winter
Eureka Stamps: winter wonderland
Happy Campers: Winters here
Little Red Wagon: Christmas with a house
Pixie Dust Studios: Sparkle and Snowflakes
Shopping our Stash: Snow/Winter
Twisted Tuesday: winter white  plus a snowflake
Wags'n'Whiskers: anything goes

Well, I hope you're enjoying your weekend. After having such a busy day yesterday I'm going to have a very lazy day today and do as little as possible, Have a good day and keep warm in this horrible cold weather. Thanks for popping by 
Claire xx


Saturday, 8 December 2012

The Funkie Junkie's Tag challenge: number 8

Good morning folks, yipppee Saturday at last, I love the weekend!! I'd like to say hello to my lovely new followers, its great to 'meet' you, I'd love to pop by and follow your blogs but I can't always see your blogger profile. If yours isn't visible it would be great if you could leave me a message or email me so I can visit you too. Anyway here's my 8th pennant inspired by Linda's fab Tag Challenge over at the Funkie Junkie . You can see Linda's tag here, its gorgeous but I didn't have many of the 'ingredients' to had to raid my stash and improvise a bit. If you haven't checked out the challenge you can find all the details on Linda's blog here. The challenge is sponsored by Linda's online store the Funkie Junkie Boutique so there are some fab prizes up for grabs.


I've created a background using the marbled stains technique (I used picket fence, tarnished brass and Vintage photo distress stains) which I overstamped with a Stampers Anonymous crackle stamp. The bells are a Joanna Sheen stamp and the poinsettias are a stamp from Chocolate Baroque. I already had this cute little Santa coloured up, so I cut him out, adding some flowersoft (eeeek, I actually used flowersoft lol) and popped him on a Szzix die cut that had the same background treatment, this time overstamped with a holly background stamp from Chocolate Baroque.

I've added some red pompom trim and some ribbon to the top of the bunting and to finish off I've made a flower from Crinoline fabric (also from The Funkie Junkie), die cut with tattered florals and coloured with Festive Berries distress ink, the centre is a faceted clear bead attached with gold stickles but the sparkle doesn't show up too well in the pic.

I'm entering this one in the following challenges:
Bearly Mine: Santa is on his way
Deep Ocean: Christmas
Everybody Art: Christmas
Oozak: anything goes plus red
Paper Playtime: Christmas Colours
Tuesday Alchemy: anything but a card

Only another week to get my Christmas bunting finished for Linda's challenge, Ive got another two done and waiting for some daylight to take their photos so that means two more to make,  guess what I'll be doing today lol??? Thanks for popping by
Claire 

Friday, 7 December 2012

Dreaming of a white Christmas at Crafty Ann's

Good morning, phew Friday at last. How come the week seems so long at work but the year is flying past? Anyway its time for a new challenge at Crafty Ann's and this time our theme is 'Dreaming of a white  Christmas' , its certainly cold enough for a white Christmas here. Anyway I've made a white on white card using this beautiful holly wreath from Crafty Ann's Digi Shop. Don't forget our challenge winner will receive a fab prize from the shop too.


I've coloured the image with promarkers and die cut with nesties, matting it on some white glitter card (that looks beige in the pic for some strange reason, camera gremlins again no doubt lol)
I've used a white embossed card back and added some clear dew drops, attached with icice stickles for some sparkle. I've added a sparkly faceted bead and some white organza ribbon to finish off.
I'm entering this card in the following challenges:
Christmas at Sweet Stampin: anything Christmas goes
Digital Tuesday: Non Traditional Christmas
I love promarkers: anything goes
LEJ Designs: Countdown to Christmas
Top Tip Tuesday: Christmas
Tuesday Throwdown: white Christmas

Its freezing cold here at the minute, certainly cold enough for snow so I hope you are keeping nice and warm. I can't wait for our first snow of the year, puppy Barney hasn't seen snow before and I'm sooooo looking forward to watching him play in it lol
Thanks for popping by today
Claire xx

Thursday, 6 December 2012

Butterfly Corners from Chocolate Baroque

Hi there, I thought it was time for a change from Christmas cards so today's card features the gorgeous new Steampunk Butterfly stamps from Chocolate Baroque. As soon as I saw the stamp sheet I fell in love with the beautiful Art Deco style corners and wanted to show them off. 

I took a 6x6 card blank and stamped the corners in each of the 4 corners of the card, i used a black fineliner pen to join the corners and create a frame. I also stamped the corners 8 times on scraps of white card. I coloured all the corners using my promarkers and created a frame in the centre of the card by cutting out 4 of the corners and popping them up with 3d foam. I cut out the flower from the remaining 4 corners and again used 3d foam to decoupage the corners on the card. The sentiment  and frame are from 'Best Relative Ever', die cut with nesties labels 4. I was going to leave the card at that but I couldn't resist adding a couple of butterflies from 'Steampunk Butterfly', again coloured with promarkers, with little black faux pearls for their bodies.

I'm entering this card in the following challenges:
Corrosive Challenge: anything goes
Loves Rubber Stamps: anything goes
Stempel Sonne: anythng goes with a stamp


Thanks for popping by and for all your kind comments, I do appreciate you taking the time to visit
Claire xx


Wednesday, 5 December 2012

The Funkie Junkie's Tag Challenge: Number 7

Hi there, I've been playing catch up with the Christmas tag  challenge over at The Funkie Junkie, here is my pennant inspired by Linda's 7th tag (pop over and have a look here, its a stunner, If you want to find out all about the challenge you can find the details here. The challenge is sponsored by The Funkie Junkie Boutique so its definitely not to be missed!)


If you pop by regularly you'll know that i'm making some festive bunting inspired by Linda's gorgeous tags, now I've made quite a few I'm getting excited about seeing them finished. For my project I've used kraft resist paper, brass snowflake charms from The Funkie Junkie Boutique. The little winter scene is a Clarity stamp, with torn edged distressed with walnut stain distress ink and matted on some corrugated card embossed with clear UTEE and gold EP. I've coloured my reindeer die cut with panpastels and triple embossed with more UTEE. To finish off I've added some gingham ribbon, a button and some twine.


I'm entering this project in the following challenges:
Crimbo Crackers: anything holiday goes
JingleBelles: anything holiday goes
My Sheri Crafts: tis the season
Oozak: anything goes plus red
Sweet Stampin: snowflakes and ribbon
The Ribbon Girls: Christmas projects
Totally Stampalicious: anything but a card

Brrrrrrr its freezing here at the minute, we've had some really frosty morning which makes it fun when the dogs take me for a walk in the morning lol. Hope you are keeping warm and cosy where ever you are and  thanks for popping by today, 
Claire xx


Tuesday, 4 December 2012

Family Christmas from Chocolate Baroque

Family Christmas is one of my favourite themeplates from Chocolate Baroque and this week it is on special offer (pop over and have a look here). I love the traditional images, perfect if you fancy an evening spent colouring :-). Pop over to the Chocolate Baroque DT Blog if you have a minute and 'meet' our new team mate Shirley, she is a lovely lady and mega talented too!

I've made a couple of quick cards using the stamps, this one features the gorgeous angel, she is so pretty I decided to go for a pink and white colour palette as a change from traditional Christmas colours. 


I used a shaped card blank and made the background using distress inks (Victorian Velvet, Spun Sugar and Iced Spruce) and the spritz and flick technique. I overstamped with the lovely Chocolate Baroque snowflake freebie from Craft stamper and embossed with a sparkly white EP, adding tiny pin gems to the centre of the snowflakes. I coloured the angel with promarkers and added lots of glamour dust for a bit of festive bling, she's been die cut with nesties and to finish off I added a little pink organza bow. I'm entering this card in the following challenges:
Charisma Cardz: Christmas with a twist, no red,gold or green
Colour me Creative: non traditional Christmas colours
Dream Valley: Non traditional Christmas colours
In the pink: its going to be a pink Christmas

My second card is more tradional, I've used a background I made ages ago by spritzing green glimmer mist on tapestry card. I used the same snowflake stamp and stamped with pearlescent ivy brilliance ink, adding red pearls in the centres with cosmic shimmer glue.


The gorgeous ribbon is from Crafty Ribbons  The image is coloured with Derwent pencils and promarkers, with dots of glossy accents to highlight the lights on the tree. 


I also stamped the sentiment (also from Family Christmas) next to the image. I've distressed the edges with my craft knife and pine needles distress ink and used dark green card for matting and layering.

I'm entering this one in the following challenges:
Addicted to Stamps: Christmas time
Card Crafters Circle: Bearing Gifts
Sparkles Forum Challenge: Christmas is coming
Wags'n'Whiskers: Christmas

Well thanks for visiting today, I hope you're having a good week 
Claire xx


Monday, 3 December 2012

A pocket full of posies at Vintage Stamping Challenges

Good morning my friends, we've got a brand new challenge starting at Vintage Stamping Challenges today and I've chosen the theme which is 'Pocket Full of Posies', we all love flowers don't we? As usual there is a generous prize up for grabs, from our lovely sponsor Leo at Flonzcraft. I've made a little gift for my DT project, hope you like it.


I've used stamps from the gorgeous 'Countrylife Pastoral' set which is a fab bargain and has some beautiful focal stamps, we often neglect the smaller stamps in a set but I wanted to showcase the beautiful flower silhouette stamps in this lovely set. I created a little gift box, using a free template from Craft Stamper magazine. I began by making the template up using brown card. I then used the template to create panels for each of the sections of the box, distressing them with antique linen ad tea dye distress ink and stamping with a crackle background stamp from Stampers Anonymous. I then stamped the flower silhouettes with versamark and embossed with gold EP. Lastly I added faux chocolate brown pearls using cosmic shimmer glue, I also used this to create some little pearl feet for the box.  I also made a floral brooch to pop in the gift box. My blogland buddy Joanna made some gorgoeus delicate jewellery a week or two ago and I took inspiration from her techniques to create the centre for my flower. Have a peep at Joanna's gorgeous work here.


I made the centre of the flower by stamping the flower silhouette on a scrap of craft resist cardstock and distressing with tea dye distress ink. I sprinkled on gold and brown mica flakes and a little green glitter and then attached a 30mm glass glintz with Maimeri gloss medium. Once it was dry I trimmed around the edge of the glass.
I made the flower by die cutting Crinoline fabric from the Funkie Junkie Boutique using the two largest flowers from Tattered Florals (3 of each). I also cut 3 of each of the flowers in netting. I coloured the crinoline flowers with distress stains and the netting flowers with alcohol ink. I layered them up, using a dot of cosmic shimmer glue in between each layer. I used more cosmic shimmer glue to attach the flower centre and left it overnight to dry. 

Next I had a bit of a problem as all the glue made it impossible to sew the brooch back to the flower. It taxed my poor little brain cell but eventually I came up with a plan lol. I die cut a circle of grungeboard, coloured with vintage photo distress ink and sewed the pin to the grungeboard before gluing it to the back of the flower. 


Phew, I was a happy bunny until I turned my back for a second and found Barney, my very mischievous puppy chewing it up! Eeek fortunately its meant to look a bit distressed lol.

I'm entering this (slightly chewed) project in the following challenges:
Alphabet Challenge: V for Vintage
Crafty Emblies: Vintage Shabby Chic
Joanna Sheen Challenge: anything goes but Christmas
Sugar Creek Hollow: Distressing
Totally gorjuss: anything goes with glitter

Well as its Monday morning, I'd better get my act together and venture out in the cold to go to work
Have a great day, whatever you are doing and if you have a few minutes do check out my talented teamies projects as they are really stunning.

Thanks for popping by
Claire xx